Friday, 5 December 2014

IndigoBlu Challenge Blog #22 - Let It Snow

Hello there, and welcome to another IndigoBlu Challenge Blog inspiration session. This months Challenge Blog theme is for a hopeful winter wonderland this Christmas so..... "Let It Snow".


For this months challenge, I decided to have a rummage through my altered art pieces. Or should I say the huge pile of bits and pieces in the corner that have yet to be altered....


I chose a small paper mache box to jazz up IndigoBlu style.
I painted the box on the inside and out with IndigoBlu Gee-Sso Good White Gesso and left to dry.

I then sprayed the whole box with IndigoBlu English Cottage Artist Acrylic Paint using Grandma's Teacup which is a lovely pastel blue colour. I sprayed it all over the box and let it run over the surface. I didn't want a perfect painted look to it, just a patchy area of colour. 

I then stamped IndigoBlu Snowflake Lace on to white cosmetic tissue using Versafine ink. I attached the tissue using IndigoBlu Slap It On Matte Medium

I made the snowflake embellishment by pouring melted UTEE in to a silicon snowflake cake mould. I covered it with FlitterGlu and IndigoBlu Morris Dance Mega Flakes
I then swiped the FlitterGlu along the edge of the box lid and added the flakes.


To join in with the challenge link your entries here.

Thanks for popping by, toodles for now...
Lis xxx 


Monday, 1 December 2014

Altered Box for ECLECTIC ELLAPU

Hello there, and welcome to my first Design Team post for Eclectic Ellapu

This months challenge for the purple team was Christmas - but not a card.


I chose a small paper mache box to jazz up.
I painted the box on the inside and out with IndigoBlu Gee-Sso Good White Gesso and left to dry.

I then sprayed the whole box with IndigoBlu English Cottage Artist Acrylic Paint using Grandma's Teacup which is a lovely pastel blue colour. I sprayed it all over the box and let it run over the surface. I didn't want a perfect painted look to it, just a patchy area of colour. 

I then stamped IndigoBlu Snowflake Lace on to white cosmetic tissue using Versafine ink. I attached the tissue using IndigoBlu Slap It On Matte Medium

I made the snowflake embellishment by pouring melted UTEE in to a silicon snowflake cake mould. I covered it with FlitterGlu and IndigoBlu Morris Dance Mega Flakes. I then swiped the FlitterGlu along the edge of the box lid and added the flakes. 


To join in with the challenge link your entries here.

Thanks for popping by, toodles for now...
Lis xxx 

Holly Bow Tea Lights for ALTERED ECLECTICS

Hi peeps, I'm posting this for my first Design Team challenge over at Altered Eclectics and I'm so excited to be part of this team. 

As this challenge is the December challenge and the last before the festives, it will run until the 1st of February. So, plenty of time to play and get your entries in. Click on the link above to go to the blog and join in with the challenge. Woo Hoo!!! Of we go....


I saved a load of baby food jars from when my little ones where tiddlers and I've had them stored in a basket in my craft room. I thought I'd dig them out and have a play with the Holly Bow stamp from IndigoBlu and IndigoBlu English Cottage Artist Acrylic Metallic Paints. I chose the most Christmassy colours to start and first went with the Metallic Gold - Goldfinger.

This is what I came up with... 


I painted the jars with a couple of coats of Goldfinger paint, these jars are glass so a couple of coats was pretty good going!
I then stamped the Holly Bow stamp on to IndigoBlu Perfect Stamping Card and painted it with Ruby Slippers and mixed Emerald City with Sleeping Beauty for a darker green. 

I then stamped the Holly Bow on to parchment paper with FlitterGlu and Chocolate Box Mega Flakes. Then layered it over the top of the painted Holly Bow. 

I then wrapped some jute string with a red ribbon around the lip of the jar. 

I did the same with the second jar but used the stamp upside down to show the versatility of the stamp. Two for the price of one!!! 
Then just pop a tealight candle in to finish...


Thanks for popping by, hope I have inspired you to recycle your glass jars in to something pretty. 


Tuesday, 11 November 2014

Some news....

I have some fab news.......

I applied for a position on a couple of design teams a few weeks ago, and like buses, two offers have coming at once!!! And I am excited to accept them both.


The two design teams - Altered Eclectics and Eclectic Ellapu are teams run by the same lovely lady Elaine. 


Altered Eclectics is an amazing altered art challenge blog run on a monthly basis that only allows altered items, no cards. Which is right up my street. I love taking a piece of nothing and changing it up and making it into something fabulous. I think that's the reason why I never throw anything away!!! I can always see the thing it can be turned in to rather than the thing it actually is. 


Eclectic Ellapu is a fun monthly challenge with two themes every month to chose from. There is inspiration every month from two teams, pink and purple and you can decide which theme you would like to work with for each challenge. 


Two amazing Design Teams to be part of... so I will be bringing you two fabulous projects each month, one for each team. I can't wait!!!

Hope to see you there!!!

Monday, 10 November 2014

Noel

Hi folks, well, as I've been demoing for IndigoBlu for a couple of months now, I've make more Christmas cards in the last few weeks than I have in years!!!
So I thought I'd share a few demo pieces. 

This one was similar to the Merry Christmas Design that I blogged a couple of weeks ago but I used the Noel Dinkie instead. 


I again used the Snowflake Lace and used the scrummy Chocolate Box Mega Flakes and FlitterGlu. I also but the design on to black but mounted it on to a background I'd created using the English Cottage Artist's Acrylic Paints

All the products I've used for this creation are available on the IndigoBlu website. You can find the links to the website, IndigoBlu blog and IndigoBlu Challenge Blog at the top of my blog page. 

Thanks for popping by. Happy crafting. Toodles xxx 

Thursday, 6 November 2014

Beautiful Blu....

Hi folks, well, as I've been demoing for IndigoBlu for a couple of months now, I've make more Christmas cards in the last few weeks than I have in years!!!
So I thought I'd share a few demo pieces. 

This is a big 8 x 8 card but putting together some quite simple elements to show off that beautiful blue background. 


I have been loving using the IndigoBlu English Cottage Artist Acrylic Paints in spray bottles to create different backgrounds. This one I made using Wimberry Pie, Park Lane, Sleeping Beauty metallic and Aladdin metallic paints. I sprayed them on to a piece of IndigoBlu Perfect Stamping Card and on to a white tag. I cut the card down to 7.5" square for my background. I stamped the Merry Christmas Circle Dinkie on to a piece of spare sprayed card using Flitterglu and covered with the new Chocolate Box Mega Flakes
For the tag, I used the flinkie technique, which I love!!! Then went around the edge of the tag and round the edge of the background card with FlitterGlu and Chocolate Box flakes.
I cut out the Merry Christmas Circle and mounted it on some foam. I then coloured some organza ribbon and adhered it on the top of the circle. 


All the products I've used for this creation are available on the IndigoBlu website. You can find the links to the website, IndigoBlu blog and IndigoBlu Challenge Blog at the top of my blog page. 

Thanks for popping by. Happy crafting. Toodles xxx 


Wednesday, 5 November 2014

IndigoBlu Challenge Blog - #21 Magical Masking

Hi folks, I'm here with some inspiration for the IndigoBlu Challenge #21. The theme for this month, 'Magical Masking' was chosen by the lovely Nikki.

You can join in the challenge here for your chance to win some fabulous IndigoBlu prizes!!!

Here is what I created...


I'd never heard of this technique before, obviously you hear of different masking techniques but what's so magical about it???
For this one, I had to do a bit of research...

I chose to work with the IndigoBlu Poppy Meadows A5 stamp set for this one and chose three different shades of Versafine red ink.
I cut three lengths of masking tape and rubbed each one with the three different inks on the sticky side of the tape.
I then stuck the pieces of masking tape on to IndigoBlu Perfect stamping card and peeled them off, leaving a lovely subtle inked line.

I then stamped the poppies over the top of the red with black versafine and added the sentiment in the corner. 

I came to the conclusion that I love this technique to create a quick wash of colour for a background.

All the products I have used to create this are available on the IndigoBlu Website

Monday, 13 October 2014

It's a blue christmas

Hi folks, thanks for tuning in.... another christmas card from me this week courtesy of those gorgeous christmasy stamps from IndigoBlu

For this creation I decide to use the stunning 'Winter Wonderland' stamp. This is a gorgeous silhouette image of a beautiful wintery scene but included the most intricate details.

I'm still in my "blue period" which worked perfect with this stamp. 


I started by spraying Sleeping Beauty and Aladdin IndigoBlu English Cottage Artist Acrylic paints on to IndigoBlu Perfect Stamping card.
I did this with two pieces of card, one to stamp on and one for the background. This is fast becoming my favourite technique with the paints as the outcome is different every time. 

I stamped the Winter Wonderland at the bottom of the smaller piece of sprayed card with FlitterGlu and used the stunning Morris Dance Mega Flakes to create a gorgeous shimmery scene. I then stamped offset over the top of it with Stazon Midnight Blue ink to create a shadow. I stamped Snowflake Lace with the same ink at the top of the card. 

I used a piece of black card as a mat which I edged with the Chocolate Box Mega Flakes then layered it on to the second piece of sprayed card. I distressed the edges of the base card to create some texture then finally matted on to a black card blank. 


You can find all of the products I've used here or use the link at the top of my blog to go direct to the IndigoBlu website.

You can also check out the IndigoBlu blog for more fabulous inspiration and join in with the current IndigoBlu challenge blog. Links for both are at the top of my blog. 

Thanks for popping by.... toodles for now. 


Wednesday, 8 October 2014

IndigoBlu Challenge Blog - Challenge #20

Hi folks, there's another wonderful challenge going on over at IndigoBlu Challenge blog at the mo so I thought I'd share some inspiration.

For challenge #20 the challenge is to follow a sketch, and here it is...


Simple enough...

So here is my take on the sketch challenge...


I went with a travel theme for this one using the IndigoBlu Map Background A6 stamp and the 'Wish You Were Here' A6 stamp. I also used the Itsy Bitsy Backgrounds stamp set. 


I started by making the background colour on the card base by spritzing IndigoBlu English Cottage Artist Acrylic paint on to IndigoBlu 300gsm Perfect Stamping card

This is fast becoming one of my favourite ways to colour card. The paints can be mixed with water in a 1 part paint to 4 part water ratio in to spray bottles. The are fantastic as the colour doesn't mute when added with water and the consistency of the paint gives perfect coverage. 

I chose Hot Cocoa, Wimberry Pie and Park Lane paint. I wanted to create a background using the Air Mail colours but adding a bit of oldie antiquey-ness.

I used the same colours on two other pieces of smaller card. 

When I was happy with the base card colour I started to stamp. I stamped the Map Background on to the larger piece of card and folded it up like a map would be. I distressed the edges of the card and added a few tears and rips then inked around the edges with Vintage Sepia Versafine. 

I stamped the 'Wish You Were Here' stamp on to the smaller piece of card and inked it with Imperial Purple Versafine.

I added the zigzag lines stamp from the Itsy Bitsy Background set on the edges of the base card and 'Wish You Were Here' piece.

I added some jute string across the centre of the base card and tied a second length of jute string at the edge with a triple knot. 


Thanks for popping by... 


Monday, 6 October 2014

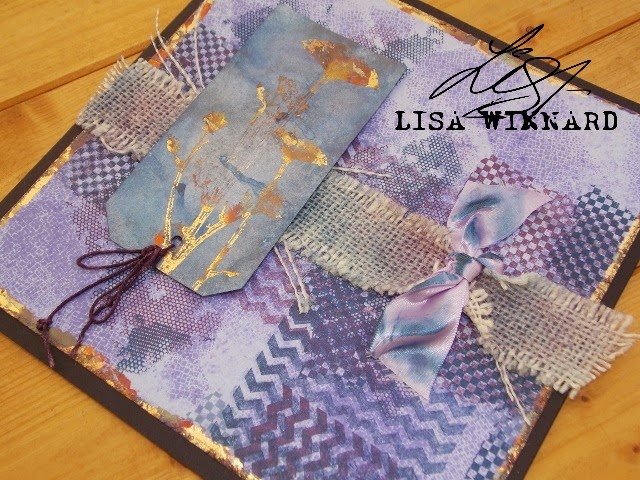
Tag!!! It's Distressed!

Hi folks, I got to have a little play this week and thought I'd get back to what I love best.... a bit of distressing!!!!

I got out the fab IndigoBlu paints and started to have a little fun.

I love these paints!!!! The IndigoBlu English Cottage Artist Acrylic Paints are so versatile. They can be used in so many different ways which is why I love them so much. 
They are a water based flat matte artist quality paint, pigment rich and is fast drying so great for those eager beavers and acid free so no stinky smells. They can also be used on fabric too!!

They can be used with a little water and put in a spray bottle to be used as a spritzer. As they are of such a thick consistency and super pigment rich the colour isn't lost when added to water.

I am completely addicted to using them as spritzers. Which is exactly what I did for this creation.


Here is what I did....


I started with an 8 X 8 square of white IndigoBlu Perfect Stamping Card. I am completely in love with this card. 

It is such good quality and perfect for this technique. It holds the paint perfectly on the surface of the card and doesn't soak in or make the paint go murky like other cardstock. 

I mixed all the paint in to different bottles to a one part paint to four parts water ratio. And started spritzing.....

I used Park Lane, Townhouse Teal and a smidge of Peppermint Tea drying the layers in between. I tend to keep my heat gun going while I'm spritzing and randomly switch between each colour. I keep the heat gun approx 12" directly above the card so it doesn't 'blow' the paint in different directions. 

When I was happy with the background colour, out came the stamps! I chose Square Peg Round Hole and Itsy Bitsy Backgrounds to work with. I didn't really have a plan for the next part, I just used the stamps randomly with Stazon Gothic Purple, Vibrant Violet and Midnight Blue until I was happy with the layout. 

I then coloured a tag with the paint using the same method and stamped it with the Umbellate stamp using FlitterGlu and adding the gorgeous new Chocolate Box Mega Flakes which look like they are good enough to eat. So scrummy!!!

I then swiped the Phat Foam with the FlitterGlu on around the edges of the base card and adhered the flakes to create a border.

I used some cream hessian ribbon which I coloured with the Stazon ink along the centre of the base card and adhered the tag using foam tape.
I tied some purple satin ribbon on the other side and swiped over it with the blue ink. 


Thanks for popping by...