Sunday 24 December 2017

Christmas Tag Decoration @ The Artistic Stamper

Hello folks and a happy and merry Christmas to you all. Today's blog post is for 

One more day till the big fella comes down the chimney.... and along with that lovely thought comes the manic wrapping!!!

So with that mind, I decided to make a Christmas decoration to go on top of a special present. 

Here is my creation...


I used Artifacts Funky Fairy stamp and the Tick Tock Christmas Baubles stamp set.

Artifacts - Funky FairyTick Tock Christmas Baubles A5 (cut out and mounted on cling cushioning)


I stamped the three baubles and the fairy with clear embossing ink on to black card. Then using white sparkle embossing powder, heat embossed it. I fussy cut the baubles out and did the same on the reverse. 


With the big bauble I stamped it again on a separate piece of card and used foam pads to make a more 3D bauble. 

I added lace and red paper ribbon to some of the baubles and attached different lengths of green/white bakers twine to each of the baubles and fairies. 


I then tied the lengths of twine together at the top with a knot.

I used some red paper ribbon to make a big bow to cover the knot of the twine.  


I hope all your Christmas gifts are wrapped as pretty. 

Wishing you all a very merry christmas and a happy and healthy 2018.
Lisa xxx 

Sunday 10 December 2017

Star of Wonder @ The Artistic Stamper

Hello folks and welcome to my post for The Artistic Stamper. 
I've been with the team now for a couple of weeks and I'm loving playing with the amazing stamps. The only problem I'm having is choosing which ones are my favourites!!!

The theme is, of course, Christmas. And it has been snowing in the North West today so beginning to feel very festive.

Here is my creation...


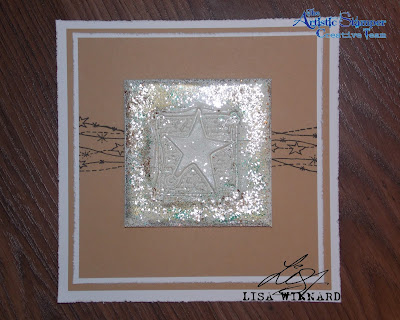
I used the new Artifacts stamps, Shooting Stars and Star of Wonder. And a colour theme of kraft card and white. 

I wanted to make a tile and imprint the image of the stamp. I first gathered a collection of embossing enamel and embossing powders in white, green, clear, gold and some with lots of sparkles. It is Christmas after all....


I cut a piece of greyboard in to a square shape just bigger than the Star of Wonder stamp. I put some clear embossing ink on the greyboard and covered it with white sparkle embossing powder. Then heated it to melt it. While the powder was molten, I added more powder, and continued to do this with a selection of colours to build up the greyboard tile. 

When I was happy with the thickness of the tile, I put the Star of Wonder stamp on to an acrylic block and added some clear embossing inkI melted the top of the tile then gently pressed the stamp in to the embossing powder.

I left the stamp on the tile for a good 30 seconds then when it had cooled slightly, peeled off the stamp. 


I then cut a piece of kraft card and stamped the Shooting Stars stamp with black ink. I stamped it on the left side and right side of the card. I then adhered the embossed tile in the centre of the card. 


I added the kraft card to mats and layers of white and kraft card

To finish I distressed around the edges of the card to add some texture.


Thanks for popping by my blog today. Leave me a comment if you wish, I love to hear what you think.
Toodles for now,
Lisa xxx 


Here are the stamps I used, which are available from The Artistic Stamper website


Artifacts - Shooting Stars   Artifacts - Star of Wonder

Friday 1 December 2017

The Artistic Stamper . . . My 1st post!!! The Artistic Stamper Challenge - Christmas

Hello folks, and welcome to my 1st post for The Artistic Stamper Challenge.  

My 1st creation is for the Monthly Challenge which starts on the 1st December, so the theme could only be... Christmas.


Here is my creation...


I first placed The Artistic Stamper 6 x 6 Random Dots mask on a piece of white card and spread a thick layer of structure paste through the mask then left to dry.

I inked the background using Broken China and Faded Jeans Distress Oxide inks.

I then stamped in between the random dots of the mask using The Mini Backgrounds A6 (Neil Walker) Stamp Set.


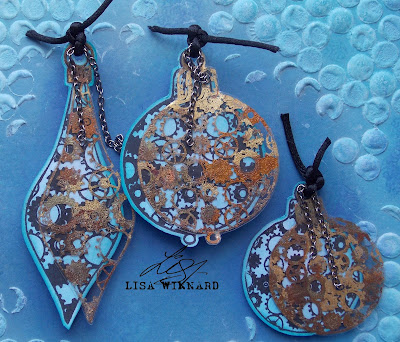
I stamped the 3 baubles from the Tick Tock Christmas Baubles set on to white card with blank ink then cut them out and inked them using Distress Inks


I stamped the same stamps on to acetate using flake and glitter glue, then added gilding flakes. 


I layered the acetate baubles on top of the card baubles and punched a hole in the top. I then thread through some black cord and some old chain.


I stamped the sentiment from the Tick Tock set on to a separate piece of card in black ink. I added flake glue around the edge of the sentiment and the edge of the background card and added more flakes. 


I adhered layers of foam pads on the back of the baubles to make them stand from the background page. 


To finish, I mounted the background on to black card.


Here are the items I used from The Artistic Stamper and they are all available on the website. 


Thanks for popping by my blog today to see my 1st creation for The Artistic Stamper. 
I hope to see you over on the Challenge page. 
Toodles for now,
Lisa xxx 


Wednesday 29 November 2017

Some news....

Hello folks and welcome to today's blog post.

This will be a short one as I just want to share some news.

The lovely Jennie Boxall from The Artistic Stamper has offered me a position on the Creative Team.


I am super thrilled to be joining the rest of the team and excited to be working with a fabulous collection of stamps and masks. 


Stay tuned for my 1st creation....

Toodles for now,
Lisa x 


Sunday 19 November 2017

Anything Goes @ Tando

Hi folks and welcome to my blog post. This week over at Tando is an 'Anything Goes' week.

With it being nearly Christmas.... And you can never have enough Christmas Trees can you??? So....


Here is my creation...


I first painted all the pieces with white Gesso. Then mixed a bluey green colour using DecoArt Fluid Acrylics - Cobalt Turquoise Hue, Phthaol Green-Blue and Primary Cyan


When the first layer of paint was dry, I dry brushed the tree with DecoArt Primary Cyan Media Fluid Acrylic.


I then randomly stamped areas of the tree with Broken China Distress Oxide ink and one of the stamps from the Mini Backgrounds #1 stamp set from The Artistic Stamper.


I took a selection of Tando Mini's including parcels and bows, ice skates, candles, brush stroke trees and snowflakes
I applied clear embossing ink on the front and back of each mini and heat embossed with Stampendous Shabby Green Embossing Enamel
I did the same with the star on top of the tree. 


When the enamel had cooled, I adhered the mini's to the tree. 


I then put all the pieces together to make the tree stand. To finish, I added some battery powered lights to the centre of the tree. 


Thanks for popping by my blog today. 
Leave a comment if you wish as I love to hear your thoughts.
Toodles for now,
Lisa xxx


Brush Stroke Trees   Tando Mini's - Candles   Tando Mini's Bells and Holly   Tando Mini's Snowflakes   Tando Minis Ice Skates   Tando Mini's Parcels and Bows   Fluid Acrylics: Cobalt Turquoise   Fluid Acrylics: Phthaol Green-Blue   Fluid Acrylics: Primary Cyan      Mini Backgrounds #1  size A6 (cut out and mounted on cling cushioning)   Image result for stampendous embossing enamel shabby green

Sunday 22 October 2017

Anything Goes @ Tando

Hi folks and welcome to my blog post for today. It's an 'anything goes' week at Tando this week. 
So, I chose to play with the Tando Ministry of Mixology Kate Crane Journal. Everyone loves a journal, but creating your own cover makes it even more personal and I had so much fun with this project.


Here is my creation...


Firstly, I chose lots of different fabrics and ribbons with lots of texture such as lace and hessian. I adhered these bits to the front cover of the journal, layering and overlaying different pieces to create lots of texture. And because there was so many layers to stick, I adhered them with matte heavy gel medium rather than a standard glue. 


I then raided my trinket box - which is masssiivvvveee!! It is full of metal embellishments, fabric and paper flowers, buttons, broken jewellery bits, cameos... along with bits and pieces of allsorts and everything. So, I had a good rummage and pulled out a few items.


I then arranged, re-arranged and re-arranged the trinket finds on to the journal cover. Again, using the matte heavy gel medium I adhere the embellishments on to the cover.  


When all the embellishments were fixed in to place, I covered the entire journal front with DecoArt black Gesso and left to dry. 


Then came the fun bit... I pulled out a selection of colours of DecoArt Media Acrylic paints. I used Blue Green Light,Cobalt Teal Hue, Colbalt Turquoise Hue, Primary Cyan, Yellow Green Light along with white and black DecoArt Gesso


After splashing a bit of paint about until I was happy, I let everything dry. Then I applied a couple of coats of DecoArt Media Ultra Matte Varnish to make sure everything looked ultra matte and to add a bit of protection to the cover. 


I hope you have enjoyed looking at my latest creation. If you would like to leave a comment please do so, I love to hear what you think. 
Toodles for now,
Lisa xxx 


Here is everything I used, which is all available from the Tando website

Ministry of Mixology Kate Crane Journal      Media: White Gesso   Media: Black Gesso   Media: Ultra Matte   Fluid Acrylics: Blue Green Light   Fluid Acrylics: Cobalt Teal   Fluid Acrylics: Cobalt Turquoise   Fluid Acrylics: Primary Cyan   Fluid Acrylics: Yellow Green Light

I would like to enter this creation in to the following challenges:
Creative Artiste Mixed Media Challenge - challenge #31