Showing posts with label Distress Oxide Inks. Show all posts

Thursday, 10 January 2019

A Fond Farewell to The Artistic Stamper

Hello lovelies and here's to a happy new year for 2019. Wow - 2019!!!! However, the start of 2019 is slightly bitter sweet as I have decided to leave the team at The Artistic Stamper. 

As the saying goes, "I've got a bit too much on my plate" to continue at the moment and there just isn't enough days in the week! So after having a chat with The Artistic Stamper owner, the lovely Jennie, she asked if I would do one last 'going-out' post for the team.

I have loved every minute being on the team and I will of course miss the fabulous ladies but I am sure I will continue to check in on the amazing creations they come up with.


So here is my last creation... 


First, I stamped some pumice stone oxide and spun sugar oxide distress inks on to my craft mat, sprayed with water and smooshed a 7" x 7" piece of 300gsm white card through. I did this a couple of times, drying in between to create a more intense layer of colour as the colours I had used were quite muted. 

I then used The Artistic Stamper 3 x 3 chevron stencil and the 3 x 3 harlequin stencil with the same oxide inks to add some pattern to the background. 


I then stamped two of the butterflies from The Artistic Stamper A5 insects and butterflies stamp set on to white card with smokey grey Versafine ink and heat embossed it with clear embossing powder. I then fussy cut the butterflies and inked them with spun sugar oxide ink. 

I stamped the Butterfly Words stamp on to white card, distressed the edges and inked the edges with spun sugar oxide ink. Then mounted it on to a bigger piece of card which I again distressed the edges and inked with pumice stone oxide ink.


To finish, I matted the background on to a piece of 7.5" x 7.5" white card which I had inked around the edges with the grey oxide ink. I placed the sentiment on to the card then added the butterflies, just in the centre to allow the wings to stick up. 


Thank you so much for popping by my blog today.
Toodles for now,
Lisa x 

Here is everything I used which is available on The Artistic Stamper website. 


Insects and Butterflies 1 A5  (cut out and mounted on cling cushioning)   Butterfly Words (cut out and mounted on cling cushioning)   The Artistic Stamper Mask Chevron 3" X 3"   The Artistic Stamper Mask Harlequin 3" X 3"   Distress Oxide - Pumice StoneDistress Oxide - Spun Sugar

Friday, 25 May 2018

Background Hello @ The Artistic Stamper

Hello folks, welcome to my latest creation for The Artistic Stamper. This month, our theme is 'backgrounds'.
Each member of TAS Design Team are working with the new collection of Tracy Scott background stamps. I used #8 in the collection. 


I started with some white card cut to 7" square and coloured it with a couple of different yellow Distress Oxide inks.


I cut a piece of white card to 4.5" square and used a couple of red Oxides and did the same with a rectangle piece of card with orange Oxides.


I used Tracy's Background #8 stamp and stamped the three pieces of card with the Oxides. 
I also used Mini Backgrounds #1 stamp set on the yellow piece of card which I stamped using a selection of the Oxide colours. 


I adhered the red square on to the yellow background. I used foam pads to attach the orange rectangle to add some depth.


I then stamped 'hello' in the bottom right corner with the A5 Decay Alphabet lowercase stamp set.


To finish, I mounted the large background on to a white 7.5" square. 

Thanks for popping by my blog today, please leave a comment if you wish, I love to hear your thoughts.
Toodles for now,
Lisa xxx 


Here are the stamps I used... which are available on The Artistic Stamper website.

Tracy Scott Background 8 (cut out & mounted on cling cushioning)       Mini Backgrounds #1  size A6 (cut out and mounted on cling cushioning)      Decay Alphabet lower case size A5 (cut out and mounted on cling cushioning)

Saturday, 24 March 2018

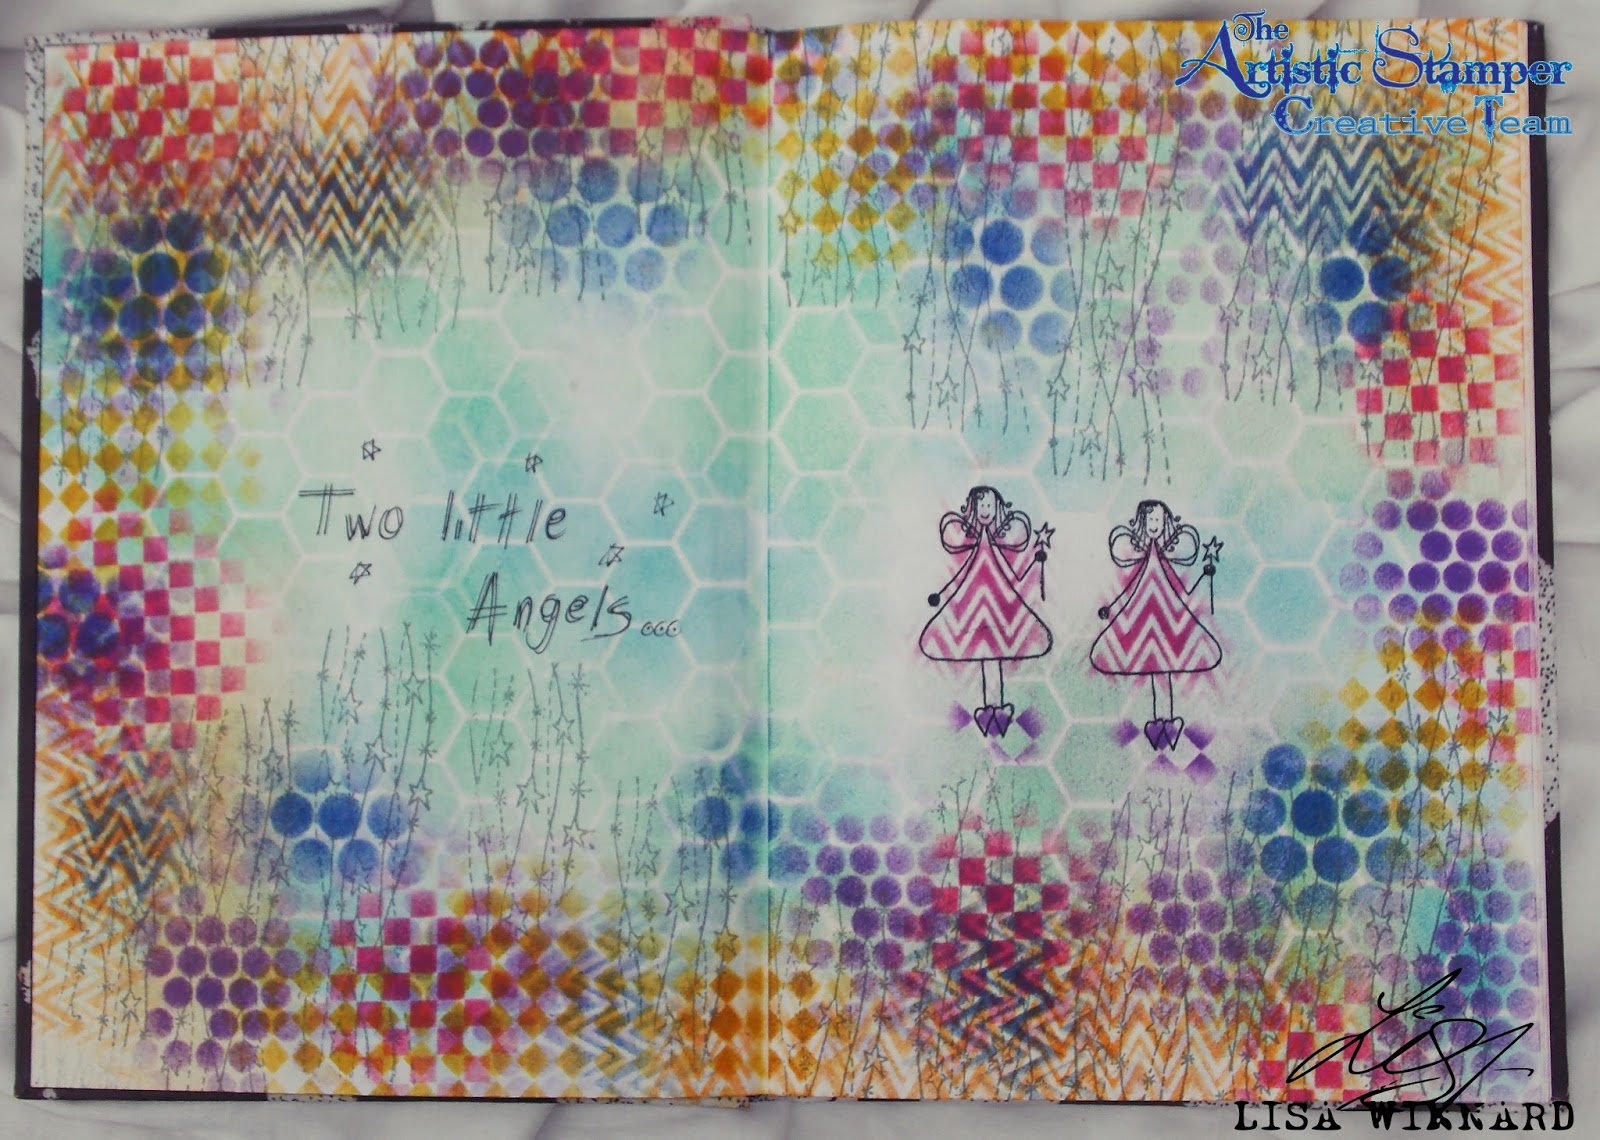
Sketchbooking with The Artistic Stamper Stencils

Hello folks and welcome to my post for The Artistic Stamper. This month our theme is Stencils.

I managed to get my hands on some more of the wonderful stencils at The Artistic Stamper and I had a right good play.
I have been persuading myself for the past couple of years now to try scrapbooking. And with multiple sketchbooks piling up I though lets try it....
So I grabbed one of my sketchbooks out of the pile, grabbed a handful of stencils and got to it. 

And here is the result...


The sketchbook I used has thick textured white pages, almost like recycled paper. So the ink tended to soak in to the pages more, but I like the faded, muted look it has given. 

The selection of stencils I used from The Artistic Stamper were the 3 x 3 Harlequin, 3 x 3 chevron, 3 x 3 sequin waste, 6 x 6 random dots and 6 x 6 honeycomb.


The Artistic Stamper Mask Harlequin 3" X 3"  The Artistic Stamper Mask Chevron 3" X 3"  The Artistic Stamper Mask Sequin Waste 3" X 3"   The Artistic Stamper Mask- Random Dots 6" x 6"  The Artistic Stamper mask-Honeycomb 6" x 6"  

I used a selection of Distress Oxide Inks to ink through the stencils.


I then wanted to add some stamping over the stencilled background. So I used The Artistic Stamper Artifacts Funky Fairy stamp and Artifacts Shooting Stars stamp.

Artifacts - Funky Fairy          Artifacts - Shooting Stars   


To finish I added some handwritten words. 

From taking the plunge in to scrapbooking, finally... I have realised it comes in the form of inspiration and creativity, not perfection. It doesn't have to be perfect, over the top and overly thought out to get it down on paper. 

I hope you like what I have done with The Artistic Stencils.
If you would like to leave a comment please do so, I love to hear your thoughts. 
Toodles for now,
Lisa xxx

Saturday, 10 March 2018

Stencils in Bloom @ The Artistic Stamper

Hi folks and welcome to my blog post for The Artist Stamper. 
This week the theme puts The Artistic Stamper stencils in the spotlight. 
I chose the 6 x 6 random dots stencil to use for this project.


I coloured the background of a white piece of card with Distress Oxide Inks then used the random dots mask with some white texture paste, which I coloured with one of the inks I used for the background.


I used the same mask with more texture paste on a small greyboard tag and added colour with the ink


I coloured some flowers with the Oxide Inks and added them to the tag with some sisal.


I stamped the word 'bloom' with the decay alphabet stamp set on to a white piece of card then inked the edges to match the colour palette.


Thanks for popping by my blog today. 
Leave a comment if you wish, I love to hear your thoughts. 
Toodles for now,
Lisa xxx 


Here are The Artistic Stamper products I used... which are available on the website.


The Artistic Stamper Mask- Random Dots 6" x 6"     Decay Alphabet lower case size A5 (cut out and mounted on cling cushioning)

Saturday, 10 February 2018

Roses are Red.... with The Artistic Stamper

Hi folks and welcome to my post for The Artistic Stamper. This weeks theme is "Roses are Red" as of course, Valentine's Day is around the corner.

Personally, I am not a lover of the commercial aspect of Valentine's Day. I prefer a nice card with some heartfelt handwritten words rather than a typical bunch of dwindling red roses. (I've never been a follower of tradition...) 

So, for this project I used the Neil Walker Heart stamp and the Mini Backgrounds #1 set 


Here is my creation...


I took a piece of card and coloured it with Distress Oxide Inks - Candied Apple, Abandoned Coral and Fired Brick then stamped the Heart stamp using Oxide Black Soot multiple times over the card. 

I then fussy cut all the hearts out and added some 3D foam just down the centre on the back of the hearts. 


I stamped the dots from the Mini Background #1 set on to white card and cut out two leaf shapes and a stem shape. I crumpled the leaf shapes to give them a more realistic look. 


I took a piece of 7" x 7" white card and inked the edges with Candied Apple Oxide ink. I adhered the stem and the leaves to the card. Then adhered the hearts on top of each other, layering them to give the look of petals.


For the sentiment, I used the Decay Alphabet - lower case stamp set and stamped 'For You' on a separate piece of card in Black Soot Oxide ink and inked the edges with Candied Apple and Fired Brick Oxide ink


Thanks for popping by, leave a comment if you wish, I love to hear your thoughts.
Toodles for now,
Lisa xxx


Here are the stamps I used on my creation which are available from The Artistic Stamper website.


Heart size 90mm x 55mm © Neil Walker (cut out and mounted on cling cushioning)   Mini Backgrounds #1  size A6 (cut out and mounted on cling cushioning)     Decay Alphabet lower case size A5 (cut out and mounted on cling cushioning)

Friday, 1 December 2017

The Artistic Stamper . . . My 1st post!!! The Artistic Stamper Challenge - Christmas

Hello folks, and welcome to my 1st post for The Artistic Stamper Challenge.  

My 1st creation is for the Monthly Challenge which starts on the 1st December, so the theme could only be... Christmas.


Here is my creation...


I first placed The Artistic Stamper 6 x 6 Random Dots mask on a piece of white card and spread a thick layer of structure paste through the mask then left to dry.

I inked the background using Broken China and Faded Jeans Distress Oxide inks.

I then stamped in between the random dots of the mask using The Mini Backgrounds A6 (Neil Walker) Stamp Set.


I stamped the 3 baubles from the Tick Tock Christmas Baubles set on to white card with blank ink then cut them out and inked them using Distress Inks


I stamped the same stamps on to acetate using flake and glitter glue, then added gilding flakes. 


I layered the acetate baubles on top of the card baubles and punched a hole in the top. I then thread through some black cord and some old chain.


I stamped the sentiment from the Tick Tock set on to a separate piece of card in black ink. I added flake glue around the edge of the sentiment and the edge of the background card and added more flakes. 


I adhered layers of foam pads on the back of the baubles to make them stand from the background page. 


To finish, I mounted the background on to black card.


Here are the items I used from The Artistic Stamper and they are all available on the website. 


Thanks for popping by my blog today to see my 1st creation for The Artistic Stamper. 
I hope to see you over on the Challenge page. 
Toodles for now,
Lisa xxx