Sarah sent me some lovely stamps a couple of weeks ago and I got to work.... The stamps I was given were the most adorable designs, excellent quality and such a pleasure to use.
I did twenty samples in all but I could of gone on forever as you can do so many different things with these stamps
These are the Inky Doodles stamp sets I used... check out the links to go to the Inky Doodles Website.
A6 Prim Accessories stamp set
A6 Stitched Alphabet stamp set
A6 Hang In There stamp set
A6 Little Patchwork stamp set
A5 Country Checks stamp set
A5 Tags And Textures stamp set
A5 You Are My Sunshine stamp set
A selection of MDF shapes
Here is what I came up with....
pin cushion
- Stamping on to white cotton fabric using Versacraft ink using the Inky Doodles Little Patchwork stamps cut in to a heart shape.
- Stitch to pink felt back.
- Using the Inky Doodles Stitched Alphabet stamps, stamp the word 'pins'. Zigzag stitch on to pink felt, stuff and stitch to back.
- Stamp the flower from the Prim Accessories stamp set on to white shrink plastic and attach to some hat pins.
- Stamp one of the patchwork stamps on to the MDF wooden heart and attach to white ribbon.
- Stuff the cushion and sew up the hole.


notelets
- Using the Stitched Alphabet stamps stamp on to white card
- Stamp the birds from the Hang in There set, colour with distress inks.
- Attach to Kraft card, stamp the stitched line along top and bottom from the Stitched Alphabet set.


purple check
- Stamp one of the Country Checks on to white card and stamp the heart in between the checks to make a repeat pattern. Add ribbon, mount on to purple card.
- Stamp the large tag from the Tags And Textures set twice on to white card and cut out.
- Stamp the small heart along with the XOXO from the same set on the the tag. Attach with a brad.


yellow bee happy
- Using the Little Patchwork stamp set, stamp each of the stamps on to yellow patterned paper using yellow ink and cut out.
- Ink around the edge of white card.
- Arrange the patchwork hexagons in to a pattern.
- Stamp the bee and the word happy from the same set on to card and ink it with the yellow.
- Attach it to the card with foam pads and stamp the bee trail on to the card.


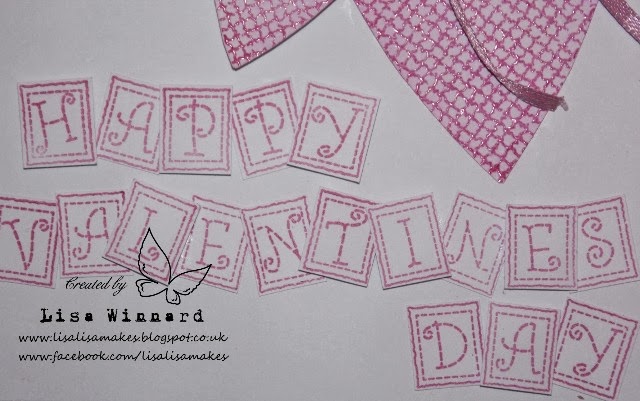
valentines
- Using the Stitched Alphabet stamps, stamp 'happy valentines day'and cut out the letters. - Stamp the large and small hearts from the Tags And Textures set and cut out.
- Stick the large one flat and add a bow, attach the small one on top at an angle using foam pads.
- Arrange the letters using foam pads on some of the letters.
- Stamp three of the hearts from the Country Checks set in the corner.


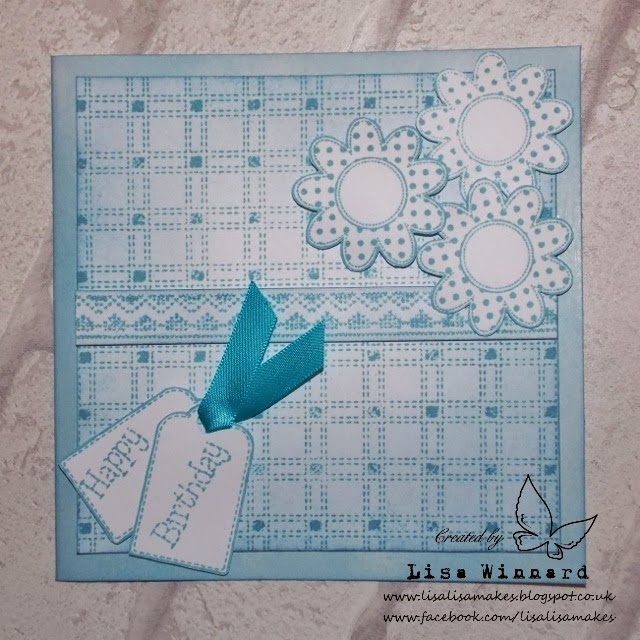
blue checks
- Using one of the check background from the Country Checks Set stamp twice on to white card and ink around the edges.
- Stamp one of the ribbon stamps from same set and cut out.
- Ink around a card blank and attach the checks top and bottom of the card.
- Add the ribbon stamp to the center using foam pads.
- Stamp 3 of the flower stamps from the Prim Accessories set on to white card in blue. Cut out, arrange using foam pads.
- Stamp 2 of the smaller tags from the Tags And Texture set and cut out.
- Stamp 'happy' on one and 'birthday' on the other from the Tags And Textures set.
- Join the tags with blue ribbon.


love
- Stamp a random background using one of the Country Check Stamps - 1st and 2nd generation stamping.
- Using one of the large MDF hearts stamp the large heart from the Tags And Textures set.
- Add some red ribbon.
- Using the Stitched Alphabet set stamp the word 'love'.


star


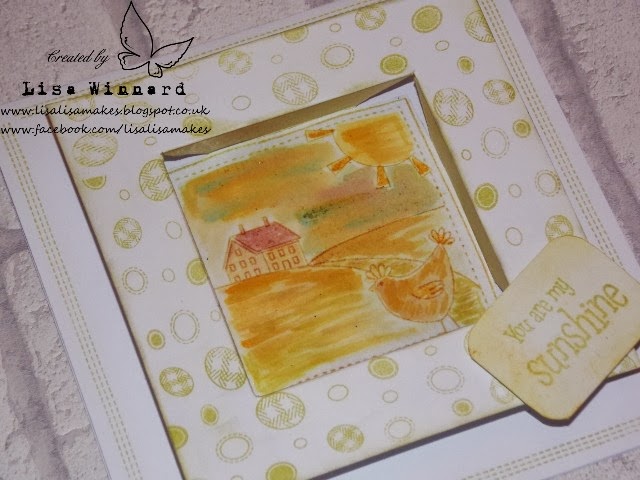
window view
- Using the scene stamp from the You Are My Sunshine set stamp on to white card and colour using Distress Inks to create a watercolour painting effect.
- Cut out and cover with clear ink and emboss with clear embossing powder. Put to one side.
- On a piece of white card, stamp the eggs stamp around the edge of the card. In the center, measure, score and cut corner to corner. Fold on the scores to create a window effect.
- Stick the scene stamped image in the centre of the card.
- Stamp the 'you are my sunshine' sentiment and adhere to the corner of the frame.
- I created this to give an effect of looking out a window on to the fields outside.


hen party
- Using the hen stamps from the You Are My Sunshine Set stamp the large hen at the front and a group of the smaller hens using a mask in silver ink and emboss with clear powder.
- Colour with distress inks.
- Using the hat off the Scarecrow stamp on to white card, colour with ink and emboss with clear powder. Cut out and attach to the card using foam pads.


hang in there
- Creating background using the large star from the Tags And Textures set, randomly stamping on white card using purple ink.
- Stamp the star from the the hanging stamp from the Hang In There set and again stamp like the background. Cut out and paper piece on to the hanging stamped on to white card.
- Stamp the hang in there sentiment on to white card and stamp the border from the Tags And Textures set.
- mat on to purple textured card and on to a kraft card blank.


hang in there (orange)
- This is using the sample technique as above put using on of the patchwork hexagons from the Little Patchwork stamp set.
- Complete the background and paper piecing and mat on to a burnt orange.


scarecrow
- Using a torn piece of copy paper ink the background using different earthy/field colours. Splash the background with water to lift parts of the ink to create the effects of rain drops.
- Stamp the scarecrow, the large hen and small hen on to white card from the You Are My Sunshine stamp set and paint using Distress Inks.
- Stamp directly on to the background to create the scarecrow post and the hens feet.
- Adhere the painted hens and scarecrow on to the background using foam pads.
- Stamp the eggs stamp from the set around the edge of a card blank to create a border.
- Mat on to yellow textured paper and on to the card blank.


black & white
- Stamp three of the ribbon border stamps from the Country Checks stamp set on to white card.
- Stamp the stitched border stamp from the Stitched Alphabet set vertical from top right to center and bottom left to center.
- Stamp the flower stamp from Prim Accessories set on to white card in black ink and emboss with clear embossing powder. Add a black jewelled brad to the center.
- Stamp the flower on to the card and overlay with the embossed flower.
- Add a black satin ribbon knot in the opposite corner.
- Mat on to black card and on to a white card blank.
- stamp the stitched border stamp on to the card blank in opposite directions to previously stamped.


black & white flowers
- Stamp the flower stamp from Prim Accessories set on to the card in black ink.
- Stamp the flower on to white card three times and emboss with clear ink.
- Overlay the embossed flowers with foam pads.
- Mat on to black card and on to a white card blank.
- stamp the stitched border stamp from the Stitched Alphabet set on to the card blank top and bottom.


mum
- Stamp the background using the Little Patchwork set with pink ink on to white card stamping the hexagons evenly spaced.
- Ink some paper flowers with the ink and arrange in the corner.
- Stamp the large tag from the Tags And Textures set on to white card and ink round the edges.
- Stamp the word 'mum' using the Stitched Alphabet stamps on the tag.
- Add one of the small MDF hearts to the tag and thread the heart and tag on to white ribbon.
- Add a pink and white button.


patchwork flowers
- Stamp one of the Country Checks stamps on to white card and cut in to squares and ink around the edges with different shades of greens.
- Arrange the squares on to a piece of green textured card in a patchwork pattern.
- Stamp the stitched border from the Stitched Alphabet set along the outside edge of the green squares.
- Stamp three of the flowers from the Prim Accessories set and ink with yellow.
- Stamp the mini flower stamp from the You Are My Sunshine set on to one of the MDF bunting shapes and heat emboss with clear ink to give it a shine. Tie some bakers twine through the holes and use a brad to hang it.
- Arrange the stamped yellow flowers using foam pads, add some ivy leaves and some smaller paper flowers and a yellow textured ribbon bow.


parchment love tag
- Stamp one of the Country Check stamps on the corner of a piece of parchment with black ink and stamp the hearts from the same set in between the design checks and heat emboss with white powder.
- Stamp the large MDF tag randomly using thre same check stamp.
- Using the Stitched Alphabet stamps, stamp the word 'love' on to the center of the tag.
- Ink some paper flowers using the same orange ink.
- Adhere the parchment to a piece of burnt orange textured card using a small amount of glue at the corners then covering with pearl gems.
- Wrap a length of raffia across the center, add the tag and add the flowers with a couple of leaves.
- Stamp the large heart from the Tags And Textures randomly using the same ink to create the background.
- Attach the card front to the background.


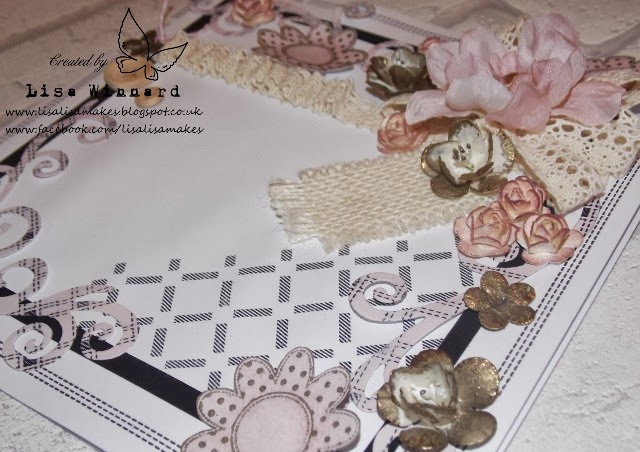
pink floral lace
This is one of my favourite samples that I did as I played around a lot with this and wanted it to be pretty.
- Stamp one of the Country Checks in the corner of a piece of white card.
- Mat on to black card and layer on to a card blank.
- Stamp the stitched border from the Stitched Alphabet set around the white card blank edge.
- Stamp the other Country Check on to a separate piece of card, ink it with pink ink and cut them out using a die cut flourish.
- Add a length of lace gathering it at one end and laying it flat at the other.
- Make a triple bow with different lace, ink a silk flower and place it in the center of the lace bow and glue a pearl in the center of the flower.
- Add a piece of jute ribbon underneath the lace bow.
- Ink a selection of paper flowers with pink ink and gold emboss some of the flowers too.
- Arrange the flowers, flourish die cut pieces, buttons and butterfly charm along the lace strip and around the borders of the card.


Hope you love these samples as much I loved making them. I had some much fun doing this project. But was allowed to come up with some fabulous ideas because of the great designs and excellent quality of the stamps.
I would also like to thank Sarah from Inky Doodles for giving me this opportunity to work with some amazing products.
Please leave me your crafty thoughts on my blog or Facebook page.

Holy cow! Lisa, you have been busy! I kept thinking "Did I miss the comment section?" and going back to check! These are all awesome! I love all the ideas you've done here and the different takes as well. Well done and wow!!!
ReplyDeleteThanks Karen. X
DeleteWow, cool, Lisa!
ReplyDeleteSo you are a celebrity now. Your samples are adorable! I am no card maker at all but I really admire people who are able to do them as lovely as you do!
Hugs,
Claudia x