This is a mixed media altered art project. I love doing altered art because it is such a good feeling to re-use and recycle something which someone without a creative eye would of originally dumped!
Like many crafters out there, I have a secret stash of 'stuff' which more often than not is cracked, broken or in pieces and which I have kept or rescued from the dustbin. When people come across it, the first thing that comes out of their mouth is "what are you gona do with that??!!" The favourite from my hubby is... "is this for the tip??!!" NNNOOOOOOOOO!!!!!
For this project I decided to use a paper mache frame which I found in a clearance corner because it was bent and a bit squashed! Ridiculous!!
So here it is...

* Step 1 - paint frame with Dulux 'Soft Truffle' Emulsion paint and dry with heat gun.

* Step 2 - spray with a fine mist of 'Copper Frost' Mica powder mixed with water in a spray bottle.
* Tip - I put my frame on a plastic bag to do this so the spray mist was finer and therefore spread more evenly.

* Step 3 - stamp the top right corner with the Postmark stamp from the Urban Stamp 'All Aboard' collection from Docrafts with clear ink. Emboss with clear embossing powder and ink over the top with Dusty Concord Distress Ink.

* Step 4 - make your own texture paste.
This is a technique I picked up from the lovely Ali Reeve from Stamps Away. Mix PVA glue with Cornflour to create your own texture paste.

* Step 5 - place the ..... mask in the top left corner and the grid mask in the bottom left hand corner and add the texture paste.

* Step 6 - ink over the top of the texture pasted area with Brushed Corduroy Distress Ink. Place the mask back over the top and randomly apply clear embossing ink. Cover with clear embossing powder and heat with heat gun.
* Step 7 - use the Patchwork Stamp Set from Stamps Away to make a repeat pattern on the inside back of the frame.


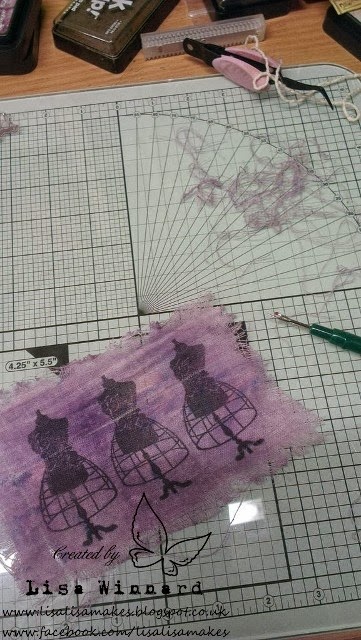
* Step 9 - cut a piece of muslin and stamp the manniquin stamp three times using jet black Archival Ink. Heat set.
Stamp your craft mat with a selection of Distress Inks - I chose Brushed Corduroy, Old Paper and Antique Photo Distress Inks. Spray with water.
Wipe the muslin fabric through the ink on the craft mat to colour the fabric. Dry with a heat gun. *** Tip - As the fabric dries the colour changes so don't add too much ink to start with, you can always add more ink and dry, then re-apply again until satisfied.


* Step 10 - pull threads from the sides of the muslin and fray areas in the center to distress the fabric.
* Step 11 - place the muslin in to the center of the frame. Cut some pieces of bronze antique lace and place over the top right corner and bottom left of the frame. I used Cosmic Shimmer glue for this and glued the lace on top and around the corner of the frame to the back.


* Step 12 - embellishments.
I recently went to an antique fair where I picked up huge bags of buttons and sewing bits. I decided to use these on the frame.
I chose different buttons based on the colour, size and sometimes material of the buttons as some were plastic, metal and fabric. I also chose some buckle pieces which I think add a bit of originality. But my favourite embellishment is the sewing machine thread reel which was in the collection of buttons I found at the antique fair.


The Finished Creation:


I really enjoyed this project and it just shows the treasure you can find hunting in the bargain bin!!
What I used:
* frame
* 'Soft Truffle' Dulux emulsion paint
* 'Copper Frost' Mica Powder
* "home-made" texture paste
* 'That Special Touch Mica Mask' - Winged Dress Form
* 'That Special Touch Mica Mask' - Grid
* Distress Ink - Dusty Concord, Old Paper, Vintage Photo, Pumice Stone.
* Clear embossing ink
* Clear embossing powder
* Docrafts Postmark stamp from Urban Stamps 'All Aboard' collection
* Patchwork Stamp Set from Stamps Away
* Muslin
* Mannequin stamp
* Vintage Buttons
* Vintage Sewing pieces
* DYMO embossing machine
This piece will definitely take pride of place in my craft room.
Thank you so much for looking. I hope I have inspired you. I you like this creation as much as I have loved making it, then please leave me a comment - I love reading your thoughts.
Toodles for now, Lis xx
I would like to enter this creation in to the following challenges:
My Creative Moments - anything Goes
Amusing challenges - Anything Goes
Anyone For Anya? - Vintage Vibes
Challenges 4 Everybody - Anything Goes
Creative Inspirations Paint - Anything Goes
Craft My Life - All Craft Challenge
C... Is For Challenge - Buttons
Craftin Desert Divas - Anything Goes
Crafty Cardmakers - Monochromatic Purple
My Craft Creations - Always Anything Goes
Sweet Stamps Blog - Frames
Crafty Creations - Make It Yourself
It's All About The Vintage - Use 3 Stamps
Simon Says Stamp - Anything Goes
Oh Lisa, this is absolutely stunning. The depth & texture is fab & your embellishments really work so well (they were a fantastic find too)
ReplyDeleteWell done, the tutorial is fab too.
xxxx
Thank You Teresa x
DeleteBeautiful project! Wonderful technique! Thanks for the fabulous tutorial and the great tips that you incorporated! I have been struggling with a cigar box I want to alter. I sanded it and painted it with Gesso about three months ago and that is as far as I have gotten. Your suggestion on how to create texture and depth have inspired me to get to work on that box again! Thanks! I am so glad you dropped this fabulous project off by our house here at 613 Avenue Create!
ReplyDeleteHugz,
Chana, Owner
Thank You so much Chana. That really means a lot. xxx
DeleteWow, this is wonderful---both the project and tutorial. Love it! Thanks for joining the Challenge at our neighborhood---613 Avenue Create! God bless, always!
ReplyDeleteJO ANN
http://jatterburycreations.blogspot.com
Super job. Love all the different embellishments. Thank you so much for joining us at Craftin Desert Divas “Anything Goes“ Linky Party.
ReplyDeleteTara
Craftin Desert Diva's
Oh how fun! I love love love the step by step photos. Thanks for linking up at Craftin' Desert Divas! ~DT Janis
ReplyDeleteWow Lisa this is gorgeous. Your tutorial is amazing, I love how your broke down every step taking us through this fabulous creation.
ReplyDeleteThanks for sharing it with us too
Lin
Crafty Cardmakers
Wonderful project and thanks for all the step by step details and photo to go with it. Thanks for playing along in the SweetStamps.com challenge!
ReplyDeleteTalk about making it yourself! WOW!!! This is great. Thanks for joining us in our Make it Yourself challenge this week at Crafty Creations.
ReplyDeleteA fabulous piece, I'm not surprised it will take pride of place. Great tutorial too. Thanks for joining in with this week's mini challenge at Anything but A Card.
ReplyDeleteBeautiful project!! Thanks for joining Challenges 4 Everybody.
ReplyDeleteHugs
Joanie
What a fabulous project!
ReplyDeleteThanks for joining us at Crafty Cardmakers!
Such a perfect creation! I like your toturial!
ReplyDeleteThank you so much for joining us at All Crafts Challenge :-))
Hugs, Andreja
Wow! What a project with so many nice details to look at! Beautiful colours, too! Thank you for joining us at It's all about the vintage and beauty!
ReplyDeleteOMG, this is so creative and beautiful! I am glad you have made a tutorial, so we could all see your work step by step. Lovely! I would like to thank you for entering my ‘C… is for challenge’ blog and I wish you good luck in the draw.
ReplyDeleteHugs,
Anna xxx
Thanks for the lovely idea.
ReplyDeleteA wonderful piece of art! Thank you so much for joining us at my Craft My Life-All Crafts Challenge, hope to see you enter again soon! Elaine-xxx- p.s I have candy if you would like to pop by and enter :-) http://www.sparklingblackrose-craftmylife.blogspot.co.uk/2013/11/all-crafts-challenge-octnov-midway.html
ReplyDelete