Monday, 7 October 2013

TTPH - IndigoBlu Challenge - Bloomin' Great

This week @ Through the Purple Haze Challenges was Team A's turn (and I'm a B player) but... as it was an IndigoBlu challenge and we had the chance to work with some real stamps - everyone wanted to join in!!


IndigoBlu is one of my favourite crafty brands. I love the designs of their stamps. Distressed, delicate and just utterly gorgeous.

So, with more of us joining in with the same challenge this week, is was going to be a good one.

I received the IndigoBlu "Bloomin' Great" stamp set 

and here is my creation. 


When these gorgeous stamps landed on my doorstep my first thought was wooooohooooo!!! However, the noise that came out of my mouth - only dogs could here!!!!

My mind started ticking. I left making a start on the challenge for a couple of days as I had so many ideas, I couldn't decide which ones to try!
I had a list of things I wanted to do...
* I wanted to do something different than a card.
* Lately, I seem to reach for the 8 X 8 card stock so wanted to do something bigger.
* I wanted a simple but striking colour palette....

I decided on a wall hanging. I could imaging this on a lovely painted garden shed.....

IndigoBlu has a kind of vintagey, distressed feel to their stamps so wanted to chose suitable colours and stick to a minimal colour palette.


I chose to work with my Distress Inks and picked Broken China, Chipped Sapphire, Vintage Photo, Old Paper and Peeled Paint to play with.


I also wanted to give it a watercolour painted feel so chose to work on watercolour 300gsm card stock. 

To start with, I stamped the large flower on to watercolour card twelve times with black Archival Ink.  I coloured it with the Broken China and Chipped Sapphire Distress Ink using a waterbrush. 


I then stamped ten of the large leaf stamp on to watercolour card using black 'Ink It Up' Ink. I then heat embossed it using gold 'Heat it up' embossing powder.


I coloured the leaves with a waterbrush and Old Paper Distress ink and went over the centre of the leaves with Vintage Photo Distress ink. 


I then stamped the large plaque stamp on to the card and again heat embossed it with the gold embossing powder. 


I tore the edges around the design and coloured it with the range of Distress Inks I was using. I stamped the sentiment in the center, at an angle of the plaque using the 'You're Bloomin' Great' stamp but only used the "Bloomin'" part of the stamp. 


For the background, I wanted to use something large and easy to manipulate. I decided to use cardboard. I peeled the top layer of the cardboard off so the corregated part was showing. I painted the cardboard with an olive coloured emulsion paint, then painted over the top, with teal coloured emulsion. I then randomly inked over the top with gold ink.


When the paint dried, I adhered the plaque to the bottom of the background. I then arranged the flowers at the top. I overlaid two flowers on top of each other, but put a wash of Vintage Photo Distress Ink on the bottom layer. 

I tied little knots of teal coloured ribbon and arranged them in between the flowers.


 Then added porcelain butterfly beads. 


To finish, I put two holes in the top and tied gold rope ribbon in a triple knot to hold. I also added a length of the rope ribbon with a triple knot at each end to the bottom to mirror the rope at the top. 


Ingredients for my creation

* IndigoBlu "Bloomin' Great" stamp set
* Waterco1our card stock 300gsm
* Black Archival Ink
* Black 'Ink It Up!' ink
* Gold 'Heat It Up!' embossing powder
* Distress Inks - Broken China, Chipped Sapphire, Vintage Photo, Old Paper, Peeled Paint.
* Gold Versacolour ink
* Waterbrush
* Teal coloured ribbon
* Gold rope ribbon
* Glue gel


I loved, loved, loved participating in this challenge, although I did have to 'swap' teams for the week!! (We have a healthy team A v's team B battle going on!! Ha Ha)

Having the chance to work with some rubber stamps and them being part of the fabulous IndigoBlu range.... It's been a good week...

Hope you like this recent creation, would love for you to leave me a comment. 

Hope to see you soon, toodles for now. 

Lisa xxx 

Friday, 4 October 2013

THE STAMPING CHEF - LEG OR BREAST NEW RELEASE

Hello all, firstly I would like to thank all my lovely new followers. Thanks you so much for joining me and I hope you love what you see. Feel free to leave me any comments, good or bad - I can take it....

Now on to the fabulous new release from The stamping Chef.


*** This is 'Leg or Breast' and is available in the 'New Release' section of The Stamping Chef store with 20% off for this weekend only. 

click HERE to go direct to the stores New Releases.*** 

This was a fabulous image to work on and I decided I wanted to use a minimal colour palette and chose browns and tan.

I coloured the image in using my ProMarkers, I started with her skin and wanted to use an olive skin tone to keep with the outfit colours I intended on using. 
I then coloured her hair using brown tones.


The outfit came next which is where I was able to mix the browns with the tan. I added a bit of another colour mixing apple and sky blue to make a light teal colour to accent the feathers in her hair and the trims on the outfit.

I am stuck in a bit of a rut at the minute - I always tend to spend an age cutting around the image with a craft knife. This time I decided to use a Spellbinders die to cut around the image creating a nicer shape than just a square. However, yes, I have no dies big enough to cut straight around the image. I need the bigger die sets. (So, if anyone is reading this who would like to know what is on my Christmas list...)

Anyway, so I put two dies from the same set around the image and drew around them, then cut them out by hand. Which to be honest, I think it looks quite good!!


I then inked around the edges. I cut a piece of brown textured card and tan textured card in to rectangles, used a corner punch and layered them off set from each other. 

I die cut some leaves from the same card and sanded over the top of them lightly.
I added two feathers in the corner of the card to match the feathers in her hair.


I adding some teal coloured gems to the feathers and corners of the card.


I finished by adding a length of teal blue scalloped ribbon down the side of the card and added a length of gold rope ribbon on top to bring out the colours in the brown. 


Ingridents:

* ProMarkers - 
Skin: vanilla, blush, rose pink, eyes: apple, sky blue.
Hair: mustard, caramel, cinnamon, sandstone
Outfit: caramel, cinnamon, henna, sandstone,spice, apple, sky blue.
Other: cool grey 4, slate, mustard, cinnamon, honeycomb.
* White feathers.
* Teal gems.
* Spellbinders dies.
* Vintage Photo & broken china distress inks.
* Card stock.
* Adhesive.
* Ribbon.

I hope you like my creation this week.
Thanks for looking. 


*** You can also click HERE to go direct to The Stamping Chef Store and have a look at the amazing selection of fun quirky designs available.***

Have a look at The Stamping Chef Facebook Page @ www.facebook.com/TheStampingChef and join in with The challenges @ www.facebook.com/groups/TSCRecipes/


Monday, 30 September 2013

TTPH - Halloween challenge with Simply Betty Stamps

Hello all, and welcome to another Team B challenge with Through the Purple Haze Challenge Blog. 

This weeks theme is Halloween and is sponsored by Simple Betty Stamps. 

As Halloween isn't much of a big thing in the UK and definitely isn't celebrated here as much as in the US, I thought this challenge would be quite a difficult one. 
I love Halloween colours - oranges, purples and greens, even venturing to yellow and black. 
My crafting imagination suddenly left town when I asked it about Halloween embellishments! 

I had a nosy around for some form of Halloween-y decorations and was told by a staff member in one store, that it was too early to stock Halloween items as it was only the third week in September. I thought well, maybe, but then queried the fact he was casually putting the Christmas puddings in straight lines!!!???!!! 

I chose the Witchy Wednesday Digi to work with from the Simply Betty Stamps Store


First of all I coloured in the image using ProMarkers. I decided early on I wanted Witchy Wednesday to have flame orange hair so started with the skin and hair.


I continued with the outfit and chose a colour palette of purples and lime green. 


I decided the cat obviously had to black. I coloured in his eyes and 'coloured' in the rest of him with a clear embossing pen. I triple heat embossed him using 'Heat it Up' Black embossing powder.


I heated him from the top to create some texture with the embossing powder.

Then came the embellishments.... As I had to be a bit imaginative... I drew a rough (as the are in nature) spider web from white card and cut it out. I inked it with orange ink then randomly dabbed areas with clear embossing ink and sprinkled areas with the black embossing powder and heat embossed it.


I wrapped thin white cotton thread around the 'web' in different directions, occasionally tying knots as I went and leaving some threads to hang. I also wrapped some around the sentiment and around the Witch's hat.

I wanted to have a more 'quirky' sentiment than just Happy Halloween so wrote free-hand the words 'Have A Witchin' Halloween' and then again, heat embossed it with the black powder and inked the background with the orange ink. 


I matted and layered purple, orange and black card on to an 8 X 8 card blank and chose an orange paper with a white motif pattern as my main background. I mounted the sentiment on to black card. 


I adhered all the elements on to the background using foam pads and sat the cat on top of the sentiment acting as a ledge. 


Ingredients:

* ProMarkers - 
Skin - ivory, satin, blush.
Eyes - lavender, lilac.
Lips - bright orange.
Hair - bright orange, honeycomb.
Outfit - lavender, lilac, amethyst, pear green, lime green.
Broom - cinnamon, caramel.
Cats eyes - apple.
* 'Heat It Up!' embossing powder - black.
* Zig clear embossing pen.
* 'Ink It Up' ink - clear, pumpkin.
* White cotton thread.
* Selection of card and paper.
* Foam pads.
* Adhesive.

I think this creation is one of my favourites because I love the image and had to think outside the box when it came to the embellishments. And to be honest, I don't think I've ever made a Halloween card!

I know one thing is for sure - when Halloween does come around I will defo be stocking up on embellishments!!!

Thanks for looking, please leave me a comment - I love hearing your thoughts.

Toodles for now. Lisa x


Friday, 27 September 2013

THE STAMPING CHEF -1ST DESIGN TEAM CHALLENGE

Well, my world wind adventure has started. Welcome to my 1st challenge with The Stamping Chef as a Design Team member.

*** This is 'Bad Habit' and is available in the 'New Release' section of The Stamping Chef store with 20% off for this weekend only. 
click HERE to go direct to the stores New Releases.*** 


As always, this is another amazing, fun and quirky design from The Stamping Chef. 

I started by colouring the skin and hair and decided right from the start she was going to be a red head.


I wanted the outfit to be shades of grey and black.


The colour palette of this creation was very minimal as I think the design speaks for itself and didn't want to take away from the design with the colour. 

For the background, I embossed a piece of black gloss card then sanded it back. I stuck the 'Bad Habit' image over the top using foam pads. 


For the backing paper, I wanted to create a disco lights feel as though the character was sitting in a bar environment, so chose a red/black/orange spotty paper. I decided it needed something in between the black swirls and spotty background so chose a white pearl paper to tone down the sharpness.


I didn't want a lots of small, fussy embellishments to go with this image so chose the huge silver hexagon embellishment to feature on its own with a length of red and black ribbon.


Ingredients:

* ProMarkers 
skin - ivory, blush, satin.
hair - cinnamon, poppy, ruby, maroon.
outfit - cool grey 4, slate, black.
* Black gloss card.
* Swirls mask.
* White pearl paper.
* Spotty paper.
* Ribbon - red and black.
* Silver metal hexagon embellishment.
* Foam pads.
* Adhesive.


*** You can also click HERE to go direct to The Stamping Chef Store and have a look at the amazing selection of fun quirky designs available.***

Have a look at The Stamping Chef Facebook Page @ www.facebook.com/TheStampingChef and join in with The challenges @ www.facebook.com/groups/TSCRecipes/

Thanks for looking, and as always, I would be very greatful if you left me a comment.


Monday, 23 September 2013

I HAVE NEWS........... NEW DESIGN TEAMS

Hello all, well as I mentioned yesterday. I have some fantastic, amazing and brilliant news!!!!

As many of you know, I am a happy member of the Design Team at Through The Purple Haze. 


I have been there for a few months now and have really enjoyed my time so far. I have met some amazing people and love the friendly family feel of the team.


But..... I decided to apply for other Design Teams and....... was extremely successful.

As you know from my blog posts I have been entering the weekly competitions at The Stamping Chef and have really enjoyed it each and every week. I love Tamara's fun and quirky designs, they are very modern and a little bit cheeky!!

Anyway, I am now a SOUS CHEF!!! I am now on The Stamping Chef design team! 


Which means I can work along side all the other fabulous Sous Chef's and play with some fantastic images.


And.... some more amazing news.... I also applied for a position on a fabulous challenge blog ONE STITCH AT A TIME and by some miracle, was again offered a position on the Design Team!!!


This is an amazing challenge blog which has a new challenge every Sunday. With lots of fabulous sponsors, being on this design team is going to be brill!! 


I have only just decided to announce this news on my blog now as I thought I may have been dreaming that I was accepted on to two new Design Teams - and didn't want to say anything until I had been given my 1st challenges. And now that has happened I can shout from the roof tops!!!

     YYYYIIIIIIPPPPPEEEEEEEEEEEEEEEEE!!!!!!

Anyway, thanks again for popping by.

I'm off to play with my new teams now, urg hem, I mean work, work with my new teams. 

Toodles for now. 

Sunday, 22 September 2013

Gerda Steiner Designs - September challenge

This is something new for me but I came across it when looking at a friends blog and thought it was soooooo cute so decided to play along.

This is my entry for September's Challenge @ Gerda Steiner Designs

This months freebies challenge was Tom the Turtle.
But, me being me.... I decided to print Tom once then print out Tom again in a mirror image... to make Tanya!

So here is Tom and Tanya, going for a walk on a summers day, chasing butterflies and picking flowers.


As I had to cut two images out, I then had to put them back together. I coloured the two images (and added eyelashes on to Tanya) and put them together holding hands. I coloured and cut out all the other elements and re-attached them using foam pads on to a silky mat background card.

Hope you like it!!


Monday, 16 September 2013

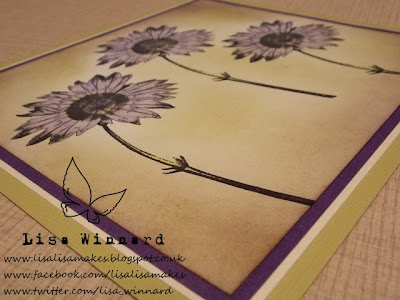
PaperArtsy #3Up Challenge - Part 3

Well, I've finally got around to posting my 3rd project I did for the PaperArtsy #3Up Challenge. 
And here it is.


I did another project with the large flower stamp from PaperArtsy Hot Pick 1011 stamp set as this stamp, apart from being gorgeous, is so versatile. 


I wanted to use a different medium to colour in the stamps and decided to use ProMarkers.


I stamped the flower three times at different levels on white smooth card with 'Ink it up!' black ink. I coloured the flowers in using Lavender, Lilac, Amethyst and Lime Zest ProMarkers.


I then inked around the edges of the card in to the center using Dusty Concord and Crushed Olive Distress Ink going from dark in the corners to lighter in the center.


I matted and layered the white card on to purple glitter card, then on to cream textured card and finished by layering it on to olive green coloured card. 


This is a different side of my crafting, which I call 'clean crafting'. Very simple, very clean and simple but still very effective.


Ingredients:

* ProMarkers - Lilac, Lavender, Amethyst, Lime Zest
* Distress inks - Dusty Concord, Crushed Olive
* 'Ink it up!' black ink
* PaperArtsy 1011 stamp set
* Selection of paper/card


Keep tuned for the final part of the PaperArtsy journey - Part 4 coming soon.

Toodles for now - leave me a comment if you wish. All comments are gratefully received.