As it's now 2014, I want to try some new crafty things for the new year, and I want to play around with creating 3D pieces. And my 1st port of call in my crafty stash of recyclables was the mountain of glass jars I have stashed away... (I have a 1 year old and therefore have stored away an enormous mound of baby food jars! Which every time I put them in the wash - hubby used to say, "do I really have to peel the labels off these jars?" Mmmmm, yey you do!!)
Anyway, I decided to bring some of these jars out of hiding for my 1st challenge at THAT CRAFT PLACE which was 'Use A Charm'.
Here is what I did...

A couple of weeks ago, I got a bag of happy post and couldn't wait to open it. Inside, amongst some other gorg bits was the most gorgeous bits of fabricy, woven ribbon and natural products. Just beautiful.
I wanted to make some glass candle lights with the jars and my happy post goodies.
But to start with I wanted to add something to the plain jars themselves.
I wanted to add some embossing round the jar as a pattern... and oh my god was this a challenge... stamping on to glass is one thing, stamping on to glass that is also a curved surface....
But...here is a 360 view.


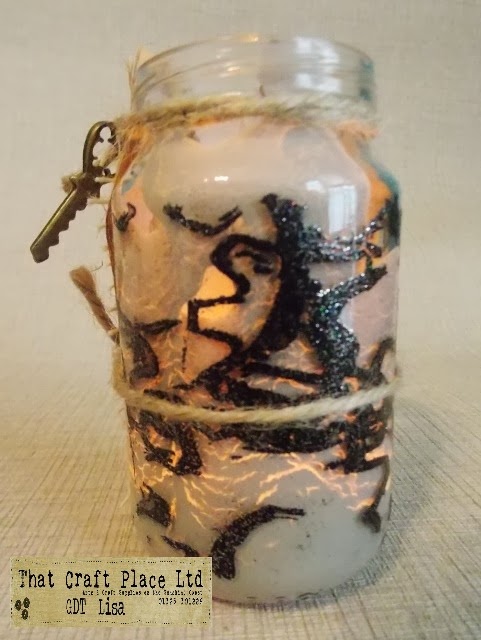

Inside my happy post bag was a gorgeous Ditzie Design stamp which I wanted to use on the large jar.
After a lot of practice, I found it was easier to stamp if the stamp was laid flat and the jar carefully rolled over it.
I inked the stamp, rolled over the jar and poured black sparkle embossing powder over the top. Then heated it with the heat gun.
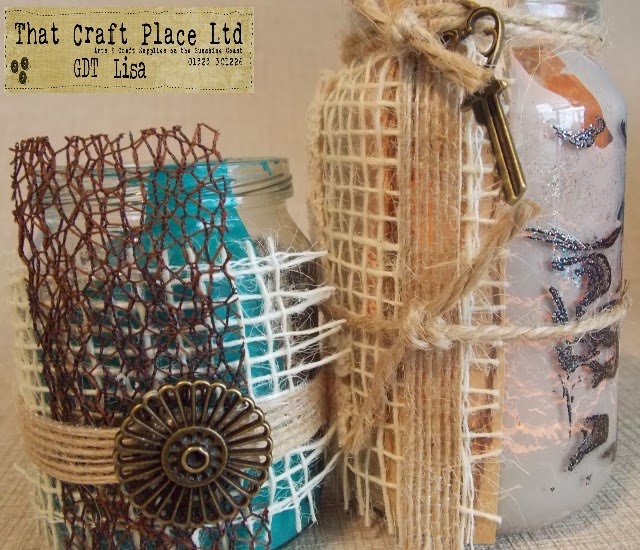
I also wanted to add some colour. I poured pebble coloured paint in to the bottom and swirled it around up the sides of the jar. I then dried the paint with a blast of the heat gun as I wanted to create a cracked effect, which wouldn't of worked if left to air dry.
I left a part of the jar blank so I could add the fabric and ribbon and also the charm.

I created a fabric patchwork and stuck it to the side of the jar (again difficult... glue on to glass....)
I wanted to add the charm around the neck of the jar and initially used some chain but then thought it looked odd with the natural fibres of the fabric. So I decided to use some jute string to match the textures and look of the patchwork.
I attached the charm to the string and wrapped it twice around the jar neck and tied it in a triple knot. I also added some around the center of the jar.
After playing around with the 1st jar, I got a bit addicted... so started on a second...
Here's my second jar...


Again I inked up a stamp using Indigoblu Crackle stamp and heat embossed it using black sparkle embossing powder.
This time, I used teal coloured paint and created another patchwork to cover the blank side of the jar.
With this jar, as it was smaller, I added the charm to the center of the jar rather than around the neck.

As these were initially to be used as candle lights, I put some tea lights in the bottom. And I think they look as gorgeous in the dark as they do in the light.

This is very addictive, and as I have a mountain of jars I'm sure I will be making more of these in the future!!!


What I used....
* Glass Jars
* Ditzie Design stamp
* Indigoblu stamp
* Black Sparkle embossing powder
* Paint - pebble and teal
* Selection of goodies from THAT CRAFT PLACE - wood veneer, jute, lace,
* Jute string
* Gorgeous charms from THAT CRAFT PLACE
Check out the shop at THAT CRAFT PLACE for all the goodies I've used above and loads more fabulous products.
Thanks for popping along for a quick look and I hope you like what I have done with some plain old glass jars. Lis xxx
No comments:
Post a Comment