Thursday, 15 May 2014

CRAFT STAMPER - "Take it, Make it Challenge" - May 2014

I am a huge fan of Craft Stamper Magazine and often play along in the Take it, Make it challenge but have never actually entered the challenge. Weird I know!!
So this month, I decided to actually add my entry to their blog.

This guidelines for this months challenge included: all entries must feature stamping done with a hand carved potato and feature some real stamping. When I first read this months challenge theme I did a double take. My 3 year old daughter came home from nursery the same day and told me she had been painting with potatoes!! She told me how much fun it was and she had loads of enthusiasm telling me how it all worked! That evening I was carving the potatoes out for myself.

We have all done potato stamping at some time in our life, and I loved the fact this challenge took us right back to the basics. 

For my potatoes, I went with a bee theme. I bought the beautiful metal bee embellishments a while ago, which are pretty big and always think what I will use them for. Because of this embellishment, I wanted it to be the main feature and create a couple of simple potato stamps to work with.


Here is what I created...


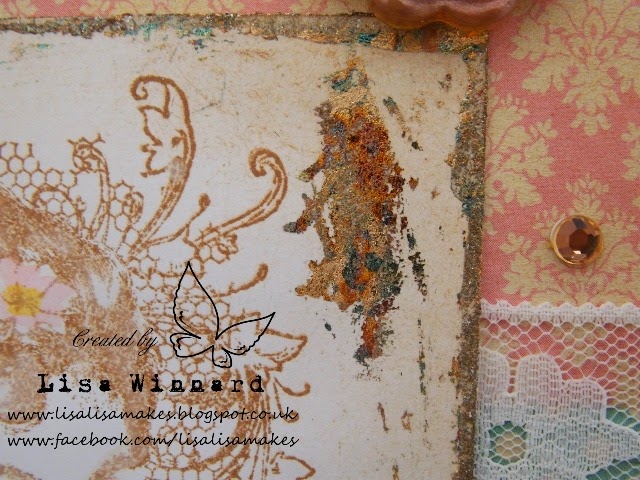
I carved my potatoes, one with a honeycomb shape and one with circles which I thought looked like a bees body when stamped. 

(After I carved them I left the potatoes for a couple of days which in potato printing land, sometimes, isn't a good thing as the potatoes go dry and 'go off'. But, on this occasion I wanted this to happen so the potatoes dried up slightly and created cracks and splits, again to assist with a more vintage feel when printed.) 


I played around a lot with the potatoes trying out different compositions and pattern layouts along with different colours. (You can see the tester pieces under the main card). I decided to use distress inks rather than paints to create subtle images. 

For my final background I stamped the potatoes using Squeezed Lemonade and Dried Marigold Distress Inks then stamped over the top with the Honeycomb Background stamp from IndigoBlu using Frayed Burlap Distress Ink. 

I added a strip of Kraft Card which I stamped the honeycomb background on to and heat embossed it using gold embossing powder. I also rubbed ink around the edges and dipped it in the gold embossing powder to create a border. I added a strip of muslin cloth which I dyed with Distress Ink. I added some bits of hessian under the strip and a larger piece at the bottom for the metal bee embellishment to sit on. 

I stamped the 'bee happy' sentiment on to Kraft card and created the border as before, added the muslin and hessian and added a metal square embellishment in the corner. I also added a strip of gold beaded ribbon to the bottom corner of the card.

To finish, I stamped the honeycomb stamp round the edges of a larger piece of Kraft Card, heat embossed it with the gold powder and added the card front to the background. 


All in all, I loved this challenge, going back to basics and playing around making different patterns from something so simple yet effective.

Thanks for popping by and I hope I have inspired you to raid the spuds!!!


Saturday, 3 May 2014

PAPERARTSY #3UP CHALLENGE 2014!!!

WOOHOO!!!!! 

I have been luck enough to be chosen again for the Paperartsy #3up challenge 2014!!

I took part in this challenge last year and it was amazing. So this year when the chance came up again, I couldn't resist.

Here is a sneek peek at what I have created for this challenge but sssshhhhh. To find out more information and to see my creation in more detail, go to the Paperartsy blog. You will also find out about all the other participants and see what they did for this challenge.  


I will also be blogging this creation in more detail so stay tuned.....


Tuesday, 29 April 2014

Happy Mothers Day Mum - 2014 card

Hello followers, I know Mothers Day was what seems like an age away, but I never got chance to show you what I made for my mum for Mother's Day. 


Here is the card I made.


I used the gorgeous Elizabeth Bennet A6 stamp from IndigoBlu. Just stunning. I've been wanting to use this for ages and thought a lovely vintage lace creation would work well. I stamped the image on to white card with Vintage Photo Distress Ink, smudged the image with a waterbrush and coloured in the flowers with Victorian Velvet DI and the bird and butterfly with Broken China DI. 


I went round the edge of the card with the stamped image on with IndigoBlu FlitterGlu and added IndigoBlu Brighton Pier Gilding Flakes to create a faux frame.  


To create the card base background, I used the frame from the IndigoBlu Bloomin' Great stamp set, stamping close the the edge with Vintage Photo DI.


I used a piece of pink paper and green spotty paper which I already had in my stash. I inked around the edges using Vintage Photo Distress Ink.

I layered the pink and green paper on to the background then added a length of wide lace ribbon across the centre. Then added the stamped image on top.


I created a flower embellishments using Tim Holtz Tattered Florals Die, made a flower and heart embellishment from pouring UTEE into moulds and adding some mica powder. I coloured some organza ribbon with Peacock Feather DI and added a Creative Expressions Dazzler to the centre. stamped a sentiment and cut in to a banner and added it to the corner of the card and added a couple of gold gems to finish. 


Thanks for popping along to my blog today.


Monday, 7 April 2014

Follow Your Dreams

Today's post is all about gilding flakes. Gilding flakes and ink.... I tried this technique a few weeks ago and got a bit aggravated. But after having discussions with my crafty facebook buddies and watching a few demos, the penny dropped. 

For this project I used the utterly gorgeous "Art Flowers" stamps designed by Sam Poole. I love these stamps and I always find myself going back to them.  I also used my lovely Peacock Feathers and Iced Spruce Distress Inks along with Indigoblu 'Brighton Pier' gilding flakes. 

This technique consists of using two or three different colours of ink to colour the stamp but leaving areas for the flitter glue to sit which will then be covered with gilding flakes. Sounds complicated right!!?? Well, I think I actually cracked it! After playing around with different card, ink, amounts of glue etc, etc. I think I've found a way that works!! 

And here it is....


Thanks for visiting today, hope you will leave me a comment. 


I would like to enter this creation in to the following challenges:


Sentimental Sundays - challenge #201 vintage/steampunk
Sunday Stamper - week 302 
Stampin' for the weekend - spring colours
Country View Challenges - It's challenge #14
Artful Times - Challenge #52

Friday, 4 April 2014

Butterfly Flutterby....

Today's post was inspired by April's challenge over at the Visible Image blog. 


This month is all about tags. I love VI stamps, I'm a huge fan, but I also love, love, love anything with butterflies. 

I wanted to keep the colours simple yet striking and concentrate on the foreground design of the tag.

I cut a tag shape from Stamps Away Ink & Colour cardstock, stamped the bottom of the tag using the Retro Dots VI stamp and Wild Honey DI. I did the same on the top edges then heat embossed with clear embossing powder.

I inked the rest tag with Milled Lavender, Seedless Preserves and Dusty Concord DI. I then sprayed it with water to give it the mockled effect. 

I stamped the butterfly twice on to SA cardstock, clear embossed, cut out and inked.

I stamped the VI butterfly sentiment using black Archival on to the tag. Attached the butterflies  and added some yellow-gold ribbon to finish.


I would like to enter this creation in to the following challenges:

Visible Image - April's Challenge - Tags

Sunday, 30 March 2014

Dream.....

Happy Mother's Day..... Today is also the 300th Sunday Stamper challenge on Hels Sheridan's blog. And as an avid stalker fan of Hels I thought I would share this post.

This week the theme was 'include the word "dream"'. Here is what I created.


This is a 10" X 8" MDF plaque which I prepped with gesso and then painted with a neutral coloured emulsion.

I used a few different techniques on this plaque and it is very Hels Sheridan inspired. 

I used a couple of different stencils and inked through them with Distress Inks. Then stamped a floral swirl and crackle background using Indigoblu stamps.

I die cut some flowers using my Tim Holtz tattered floral die from music paper and inked them with Walnut Stain DI. 

I filled a vial and the center of the flowers with black glitter.

I stamped "DREAM" on to card, inked it and made it into a ribbon. 
I added some embellishments and jute twine to finish. 


Thanks for looking today.