Monday, 29 September 2014

It's an IndigoBlu Merry Christmas...

Hi Folks, I'm getting all ready for Christmas.... well not really as I've never been the most organised person, usually running round on Christmas Eve. However, as I am now part of the fabulous IndigoBlu demonstrators team I get to play with the lovely new products and of course, this years gorgeous new christmas releases. 
This years christmas stamps are amazing!!!!!! I've chosen three of the new stamps for these two creations.


They are both 8 X 8 designs on black 300gsm card.

Here is the first design...


On the first design I used the snowflake lace stamp to create a border edge. I stamped it using FlitterGlu and used Lancashire Rose Mega Flakes

I then stamped the Design Merry Christmas on to acetate, again using FlitterGlu. Again I used Lancashire Rose Mega Flakes on the acetate but picked the flakes out individually so the whole design was covered in a similar colour of flake. I went around the edge of the acetate with the FlitterGlu and flake to create a border then matted it on to black card. 

I used some crushed gold ribbon down the side of the card and pinched it in the centre then attached the Merry Christmas sentiment over the top of the ribbon using foam tape.


For the second design....


I used the Fancy Bauble Dinkie and Winter Dawn Mega Flakes. I stamped the Fancy Bauble in a repeat pattern then added the Winter Dawn Mega Flakes. I stamped the Design Merry Christmas on to black card with the flakes and edged it to create a border. I then adhered it to the centre of the card using foam tape.


Two simple but effective christmas designs from the gorgeous new IndigoBlu Christmas stamps. 

All the products I have used for these two designs can be found on the IndigoBlu website here.


Thanks for popping by..... 

Thursday, 11 September 2014

PaperArtsy GDT

yyyyeeeeyyyyy.... It's here. The time I get to share with you all. It's my Guest Design Team post for PaperArtsy.


I was recently offered the opportunity to play a small part on the Paperartsy Design Team. And as I am a huge fan of everything Paperartsy I of course jumped at the chance.

So... I was asked to chose a stamp plate and some PaperArtsy Fresco Finish Chalk Acrylic paints. I chose the gorgeous Hot Picks 1211 stamp plate and South Pacific and Beach Hut Fresco Finish paints to work with.

I chose the Hot Picks 1211 stamp set because I fell in love with the vintage sewing images. As I have a background in textiles I have always enjoyed working with vintage sewing patterns, searching for vintage materials and fabrics.... so this stamp plate seemed perfect. 

I decided to make something different and wanted to concentrate on the 3D element. I chose to make a vintage themed sewing box. I wanted the box to have a 'Cinderella' feel about it. The part in the film when the little mice sew a beautiful dress for Cinderella and the are running around in between the cotton reels.... 


I chose quite a large MDF box to work with. I sanded the box and gave it a couple of coats of white gesso. 
I painted the inside of the box with South 
Pacific and the outside and lid with Beach Hut PaperArtsy Fresco Finish Chalk Acrylics. 


I stamped the multiple cotton reel tops stamp on to one-ply of cosmetic tissue using Versafine Vintage Sepia ink in a repeat pattern to cover the size of the lid. I adhered it to lid using IndigoBlu's Slap It On Matte Medium. 


I stamped the full cotton reel stamp numerous times to create a line with Versafine Vintage Sepia ink. I did this twice and adhered it to each short side of the box. I did the same with the tape measure stamp and adhered it to the long sides of the box.


I painted some wooden cotton reels with South Pacific Fresco Finish and inked over them with Vintage Photo Distress Ink then wrapped different threads around each reel. I used some white cotton, vintage lace and a length of vintage trim which I inked with Vintage Photo and Peacock Feathers Distress Ink. 


I then stamped the round cotton reel end a number of times on to white card using Versafine Vintage Sepia ink, distressed them with Vintage Photo Distress Ink and adhered them to each end of the wooden cotton reels. 


I made a little folded packet from card and stamped the needles stamp on the front using Versafine Vintage Sepia ink. Then inked over it with Vintage Photo Distress ink. 


I hunted around in my large collect of vintage stash for some embellishments. I found some buttons, an old distressed dressmaking tape measure and some metal findings. 
I arranged the found pieces on top of the box lid with wooden cotton reels and needle packet. 


To finish, I dyed a length of lace with the distress inks and adhered it at the base of the box.


Check out my creation over at the Paperartsy blog here


Thanks for popping by, leave a crafty comment if you wish. xxx 

Wednesday, 10 September 2014

IndigoBlu Indian Summer

Hi folks, here's my inspiration for the Indian summer challenge over at IndigoBlu. You can check out more inspiration from the fabulous IndigoBlu Design Team and link your entries here.


I sprayed some white IndigoBlu Perfect Stamping card with IndigoBlu's English Cottage Artist Acrylic paints. I used Burning Bonfire and Postbox Red from the Autumn Collection. Then sprayed over the top with a smidge of the gorgeous Ruby Slippers from the new metallics range.


I chose the Butterfly Collector stamp set to work with. I repeatedly stamped the grasses along the bottom of the card  then stamped the butterflies at the top right using Onyx Black Versafine ink


I stamped the butterflies on to some acetate with FlitterGlu and covered it with Lancashire Rose Mega flakesI cut the butterflies out, bent the wings and adhered them over the stamped butterflies.


I stamped the grasses stamp in parts with FlitterGlu but slightly offset them against the black image. I again used Lancashire Rose Mega Flakes. 


To finish I matted on to some black card and went round the edges with FlitterGlu and Lancashire Rose Mega Flakes to bring in the colour.

All the products I have used are available from IndigoBlu.


Thanks for popping by....


Sunday, 10 August 2014

IndigoBlu Workshop


Come and join me on Saturday 20th September 10am - 4pm for a full-blown IndigoBlu workshop!!!  

Do you want to learn a range of techniques with some amazing products from IndigoBlu? I am an official IndigoBlu Demonstrator trained by the best!! 

In this workshop, we will be using a fabulous range of techniques to decorate a wooden box using the stunning products from IndigoBlu.

I will take you through each technique from scratch using IndigoBlu English Cottage Artist's Acrylic Paints, the amazing Kroma Crackle, IndigoBlu's Altered Ego's, IndigoBlu's Mega Flakes and Flitterglu and a range of IndigoBlu's finest quality stamps. 

The day has been planned for you to express your creativity to the max, but of course, with a huge bunch of fun and socialising thrown in, along with refreshments and scrummy biscuits.
This workshop has been designed for crafter's at all levels of experience.


The Venue

Address: Food Positive Ltd, Upper Dicconson Street, Wigan, Lancashire, WN1 2AG


The venue is located within a 5 minute walk from Wigan Town Center with easy access by rail/bus and is within walking distance of Wigan Train and Bus stations. 
Parking is also available outside the venue.

Unfortunately, there is no disabled access at this time due to construction work on the building. Toilet facilities are located on the first floor of the building. 


What is provided...

* All materials and use of IndigoBlu products are included in the price.
* Free refreshments throughout the day.

What you need to bring...

* Apron
* Basic tool kit - scissors, etc
* Lunch 

Cost

£35 which includes all refreshments, cost of materials including wooden box and use of all IndigoBlu products. 

IndigoBlu products will also be available to purchase on the day. 

Payment via Paypal is requested. 


The small print....


Full payment should be made up front when you commit to attend the workshop.
Should you be unable to attend please notify me asap. 
I regret that I will be unable to provide you with a refund unless I can re-sell your place. 


Contact information...

You can contact me via facebook for further information, to book your place or to answer any questions you may have.
Further contact info is available on my blog sidebar. 

IndigoBlu Website

Check out the indigoBlu Website to view all the wonderful products and more here... 


Sunday, 3 August 2014

My New Tool Caddy.....

Hi folks, well jumping sticks.... It's all done, finally.... Finished.....

I've been working on a lovely new project for a few days now and I have to say.... I'm quite pleased with the results. In fact - I'm chuffed!!!!

I wanted a new tool carrier for a while. I've bought a few different ones in the past but have always fell out with them after a couple of weeks. For some reason, I never seemed to be able to find anything that I put in there!!! 

Which when you are holding on to something which needs sticking down with one hand and rummaging about with the other hand looking for the thing you knew you put in that specific pocket but now seems to have done a flit..... It gets a bit frustrating. 

So I thought about it and thought about what I really wanted.... an old style wooden tool box. Similar to the old milk bottle carriers. So off on the hunt I went. Which was so unsuccessful!!!! I did find a few... that were too big, too small, to long, too heavy, didn't hold enough weight.... I mean come on!!!!

Finally after a few hours of internet searching I came across one that carried bottles. YES!!! so it will take on the weight of my crafty tools. Size? YES perfect. Made of wood? YES perfect.... It was all coming in to play. Until I looked at it in finer detail. It wasn't pretty looking at all!!!
Here is the before....


Well that was such a shame (insert sarcasm here) - as that was the perfect opportunity to get the crafty stash out and start playing. 

I decide I wanted my new tool caddy to be a fabulous creation so picked out some of my fave IndigoBlu stamps. I thought it would be a great advertisement for IndigoBlu products too when I am out and about doing my IndigoBlu demos and workshops. 


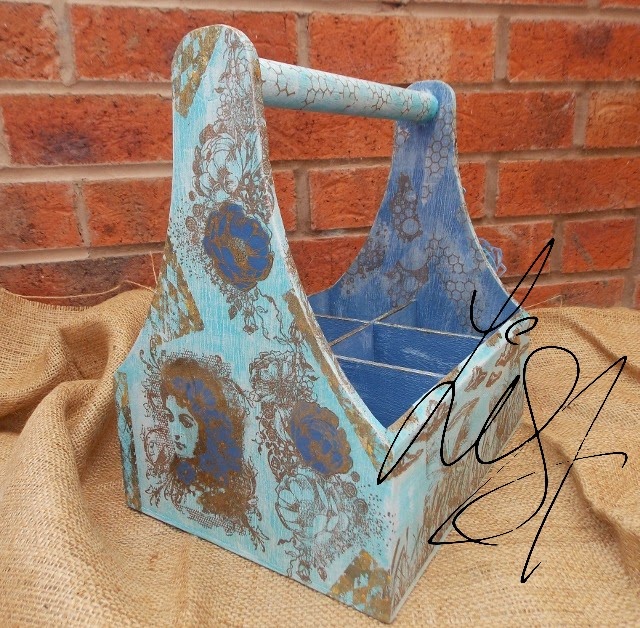
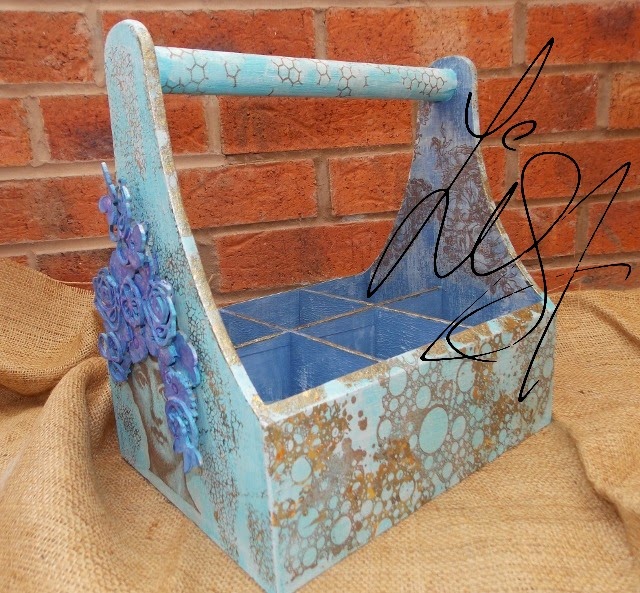
So.... here is my finished creation...


After a good sanding and couple of coats of IndigoBlu White Gee-Soo Good! I went with the luscious IndigoBlu English Cottage Artist's Acrylic Paint using the stunning Townhouse Teal and Park Lane colours from the Summer collection. 
I still can't decide which one is my favourite in the Summer Collection but I went with these two as I think I'm still going through my blue/turquoise/teal phase. 


I used Park Lane on the inside of the caddy and Townhouse Teal on the outside. 


The IndigoBlu stamps I chose to work with were:  Elizabeth Bennet, Nature 1, Jane, Crackleglaze Background, Honeycomb Background, Bubbles BackgroundRose Blush, Butterfly, Harlequin.


I stamped each of the stamps several times on to one ply of white cosmetic tissue with Versafine Vintage Sepia ink. After tearing the tissue around the edge of the stamped images I decided where to put them on the caddy. 

To adhere the stamped images on to the caddy I used IndigoBlu Slap It On Matte. This is THE most AMAZING stuff!!! And its so easy to use, just do what it says on the bottle!!! Literally.... SLAP IT ON!!! 

I placed the stamped tissue on to the caddy and used a large brush to apply the Slap It On until the tissue had adhered to the wood. 

I worked my way around the caddy until all the images I wanted were adhered in suitable areas.  


The next step involved one of my favourites. MEGA FLAKES!!! IndigoBlu Mega Flakes are just MEGA. They are huge! I chose a selection of the stamps, Yorkshire Dale Mega Flakes and along with IndigoBlu trusty FlitterGlu, got gilding. 


On both of the caddy ends, I wanted to add some more, different techniques. On the Elizabeth Bennet/Rose Blush side I chose to stamp the images on to acetate with FlitterGlu and add Mega Flakes. I painted on the reverse, over the flowers on both stamps with the Park Lane Acrylic Paint. I then adhered them over the top of the original stamped image. 


On the opposite side of the caddy, I wanted to add something around Jane. I chose to add some IndigoBlu Altered Ego's to create some 3D art and chose the Florals collection to work with. 

I arranged the Altered Ego's in quite a random way, layering, adding and changing each piece until I was happy. I gave them a coat of white Gee-Soo Good! and mixed up the paint with water in spray bottles. I sprayed alternate colours until I was happy with the colour. 


To finish, I wrapped some jute string around each end of the handle to create a more rustic look. 


I am so chuffed with this project. I love how each little element has come together and created something that original was so boring to look at, is now something that is worth carrying around. 

This is definitely my new handbag!!!


Bits and Bobs I used...

* IndigoBlu English Cottage Artist's Acrylic Paint - Townhouse Teal, Park Lane.
* IndigoBlu white Gee-Soo Good!
* IndigoBlu FlitterGlu.
* IndigoBlu Stamps: Bubbles Background, Elizabeth Bennet, Nature 1, Jane, Crackleglaze Background, Honeycomb Background, Rose Blush, Butterfly, Harlequin. 
* IndigoBlu Slap It On Matte.
* IndigoBlu Mega flakes - Yorkshire Dales.
* Versafine Vintage Sepia.

All these products can be found on the 
IndigoBlu Website.


I would like to enter this project in to the following challenges:

Rhedd's Creative Spirit - altered art August challenge. 
Altered Eclectics - August challenge.