Tuesday, 11 June 2019

Art Techniques Tag “24 Play Days”

Art Techniques Tag “24 Play Days”
By Lisa Winnard for Tando Creative – June 2019

For the “24 Play Days” tag this week, I decided to concentrate on creating a mixed media piece rather than focusing on just one particular technique.
I have tried to include as many techniques and different types of products as I could to make this piece.


List of products...

Tando greyboard – tag, compass (small), Mini’s Arrows
Tando - hearts stencil
DecoArt Premium Acrylic Paint – Pyrrole Red, Cobalt Teal Hue, Texture Sand Paste, Crackle Paint
Rice paper
Sketchbook paper
Chequered stamp (Carabelle Studio)
Crochet flowers
Ribbon
Wool string
Gesso - black and white
PVA glue
Collall glue


STEP 1
Paint the Tando tag with a coat of white gesso and dry with a heat tool. Paint a coat of Cobalt Teal Hue with white gesso to create different shades and lines of colour. Dry.


STEP 2
Apply PVA glue to the tag. Place rice paper over the top and smooth down with a paintbrush and PVA glue. Tear or cut the excess.


STEP 3
Paint the Tando compass with black gesso and dry with heat tool.


STEP 4
Mix DecoArt Cobalt Teal Hue with DecoArt Crackle Paint and paint the compass. Let it dry naturally. When dry add some black and white smudges of gesso to distress the compass. 


STEP 5
Take the arrows and apply DecoArt Texture Sand Paste. When dry, paint with black gesso.


STEP 6
Add DecoArt Premium Acrylic Pyrrole Red around the edges of the rice paper covered tag.


STEP 7
Stamp the chequered stamp around the outside of the tag. Stencil some hearts with the red paint.


STEP 8
Fussy cut an image/s from scrapbook paper.
I chose an Alice in Wonderland themed sheet of scrapbook paper which I cut several pieces from. The character, the checkerboard borders, the sentiment/words and the floral tag.


STEP 9
Start to arrange the scrapbook papers and the other elements on to the tag. Stick them to the tag. I used Collall glue for the majority of the elements but raised Alice using foam tape.


STEP 10
Colour some white crochet/fabric flowers red but not completely. (Initially I chose teal flowers which matched the blues in the pallet. But then changed my mind after singing “We’re painting the roses red, we’re painting the rose red”...)
Adhere these under/around Alice’s feet.


STEP 11
Chose a couple of different ribbons/yarn/string/wool for the tag hole. I chose some red ribbon with white hearts (to match the stencilling) and a length of teal blue wool yarn.


 Toodles for now...
Lisa


Saturday, 16 March 2019

Dark and Moody with Tando

Hello folks, welcome to this weeks post for Tando Creative. 
This weeks theme is 'dark and moody' and  I used Andy Skinner's Scared Secrets kit.


What I used...

* Andy Skinner's Sacred Hearts Tando Creative Kit.
* DecoArt Media Line: texture sand paste, crackle paint, white        gesso, black gesso
* DecoArt Premium Acrylic Paints: Paynes Grey, Phthalo Blue, 
  Primary Cyan, Quinacridone Gold, Pyrrole Red.


What I did...

* Paint all the elements with DecoArt white Gesso.
* Add DecoArt texture sand paste to the cogs, washers and screw        heads.
* Add DecoArt crackle paint to the other elements.
* Paint with DecoArt Premium Acrylic Paints. The colours I used        were: Paynes Grey, Phthalo Blue, Primary Cyan, Quinacridone Gold,    Pyrrole Red.
* Paint the heart outline with black gesso.


Thanks for popping by my blog today.
Toodles for now,
Lisa x


Here are all the products I used and they are all available on the Tando Creative Website.

Andy Skinner Sacred Secrets    Media: Texture Sand Paste    Media: White Crackle PAINT    Media: White Gesso    Media: Black Gesso    Paynes Grey Premium    Phthalo Blue Premium    Primary Cyan Premium    Quinacridone Gold Premium    Pyrrole Red Premium

Sunday, 10 March 2019

Change of Blog Name


Hello lovelies... 

I have recently changed the name of my blog( and I wanted to explain my reasons behind it. 

I have been working in my craft room for a good few years now so wanted to give it a name, but a name more creative than just 'my craft room'. 


So after 5 years of thinking I have finally come up with a name I am happy with. 

"The Craftarage Studio". 


I decided on this name as my now craft room was once the garage, hence the word craft(g)arage, stating what it is and what I do in there. 

I have also changed the name of my facebook page to Thee Craftarage Studio which I will be posting lots more content to  in the near future and hope I will inspire you along the way. 
If you would like to pop by my facebook page, here is the link 

Toodles for now,
Lisa x

Thursday, 10 January 2019

A Fond Farewell to The Artistic Stamper

Hello lovelies and here's to a happy new year for 2019. Wow - 2019!!!! However, the start of 2019 is slightly bitter sweet as I have decided to leave the team at The Artistic Stamper. 

As the saying goes, "I've got a bit too much on my plate" to continue at the moment and there just isn't enough days in the week! So after having a chat with The Artistic Stamper owner, the lovely Jennie, she asked if I would do one last 'going-out' post for the team.

I have loved every minute being on the team and I will of course miss the fabulous ladies but I am sure I will continue to check in on the amazing creations they come up with.


So here is my last creation... 


First, I stamped some pumice stone oxide and spun sugar oxide distress inks on to my craft mat, sprayed with water and smooshed a 7" x 7" piece of 300gsm white card through. I did this a couple of times, drying in between to create a more intense layer of colour as the colours I had used were quite muted. 

I then used The Artistic Stamper 3 x 3 chevron stencil and the 3 x 3 harlequin stencil with the same oxide inks to add some pattern to the background. 


I then stamped two of the butterflies from The Artistic Stamper A5 insects and butterflies stamp set on to white card with smokey grey Versafine ink and heat embossed it with clear embossing powder. I then fussy cut the butterflies and inked them with spun sugar oxide ink. 

I stamped the Butterfly Words stamp on to white card, distressed the edges and inked the edges with spun sugar oxide ink. Then mounted it on to a bigger piece of card which I again distressed the edges and inked with pumice stone oxide ink.


To finish, I matted the background on to a piece of 7.5" x 7.5" white card which I had inked around the edges with the grey oxide ink. I placed the sentiment on to the card then added the butterflies, just in the centre to allow the wings to stick up. 


Thank you so much for popping by my blog today.
Toodles for now,
Lisa x 

Here is everything I used which is available on The Artistic Stamper website. 


Insects and Butterflies 1 A5  (cut out and mounted on cling cushioning)   Butterfly Words (cut out and mounted on cling cushioning)   The Artistic Stamper Mask Chevron 3" X 3"   The Artistic Stamper Mask Harlequin 3" X 3"   Distress Oxide - Pumice StoneDistress Oxide - Spun Sugar

Sunday, 11 November 2018

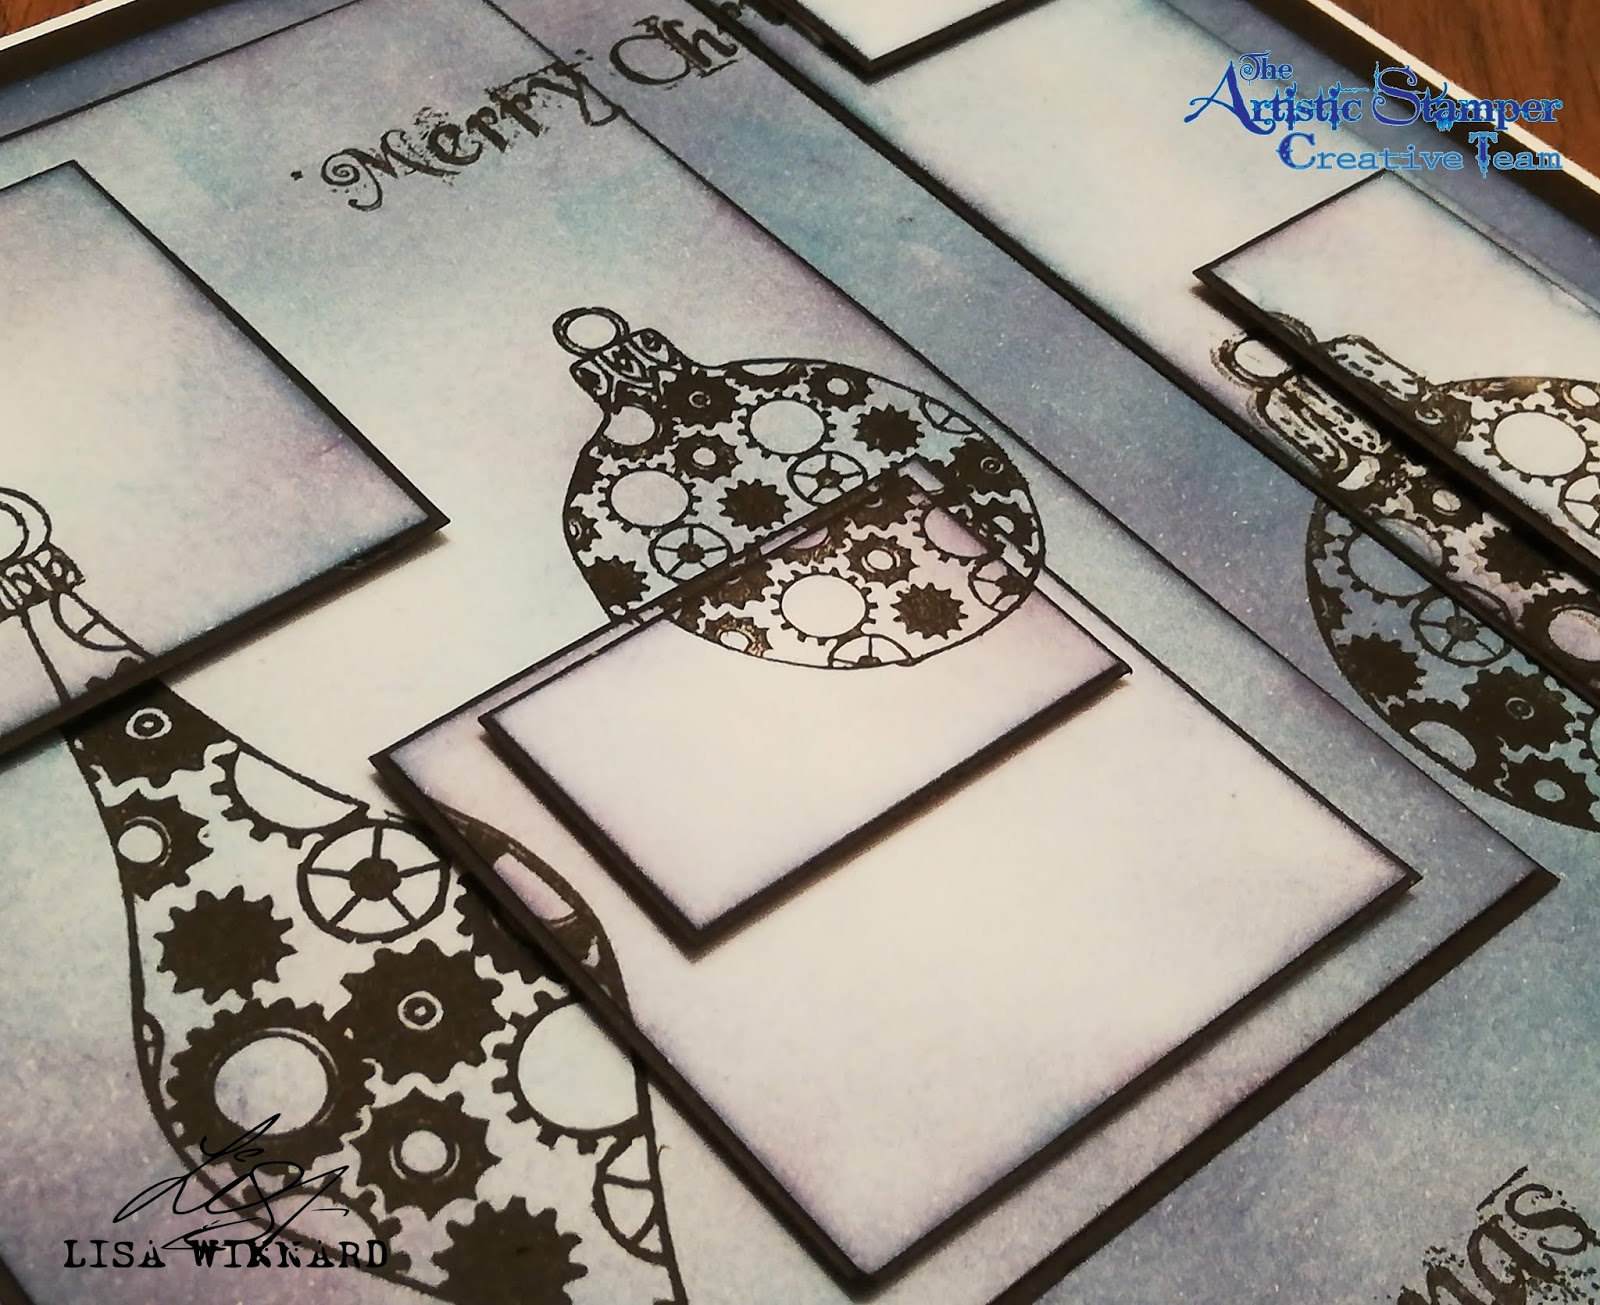
All Squared Up

Hello there!! I realise I have not blogged for a while, it has been a busy, busy few weeks. But, I am back with a post for The Artistic Stamper. This month's theme is "Square It".

So here is what I did...


I cut a card blank at 7&3/4" square for a background then cut several other smaller pieces to fit inside the background piece.

I coloured all the individual pieces with Peacock Feathers and Dusty Concord Distress Inks.


I placed all the different card pieces in the correct places then stamped the Tick Tock Christmas Baubles on to the card.


I then matt and layered all the pieces on to black card leaving a very slim border, then used foam pads do stack each layer to give a 3D effect.


Thanks for popping by,
toodles for now.
Lisa x


Tick Tock Christmas Baubles A5 (cut out and mounted on cling cushioning)

I would like to enter this in to the following challenges -
That's Crafty challenge blog - anything goes
Sandee and Amelie Steampunk Challenges - winter special

Saturday, 13 October 2018

Tando 3D Challenge for Craft Stamper magazine.

Hello lovely lot. As you may have heard, the Tando team were given a 3D Challenge to feature in Craft Stamper Magazine. 

We were all given the same 3D substrate, designed by Di to play with and decorate. Being a CS subscriber I have seen all the examples and they are all so different. There are so many things you can do with it. 


Here is my take on it...


So, the 3D substrate opens up as a gate fold with help from the fabulous and creative stretchy hinges to reveal two little storage spaces to put in whatever you wish...


With Tando greyboard you can throw anything at it you wish, and that is just what I did! It can take a huge amount of different mediums without falling apart like other products.
So, my first layer was a nice thick layer of DecoArt Crackle Paint and DecoArt Texture Sand which I added both the different mediums quite randomly on the outside of the substrate.


When the crackle paint and texture sand had dried I painted it with DecoArt Premium acrylic paint. And added a bit of dry brushing with DecoArt white Gesso. 

I added lots of stamping to the outside and inside using a selection of Carabelle Studio Stamps using StaZon Ink.


Then came the question, what to put inside.... I decided to turn my substrate in to a mini stationery kit, so I added some small pieces of paper and mini pencils. I thought this could be a cool little item to keep near the telephone, or next to the noticeboard when a quick list or message would need to made...


I took a piece of thin white ribbon and painted it with the different shades of blue DecoArt Premium Acrylics, then tied the ribbon at the front to close the gate fold front.


Thanks for popping by my blog today.
Toodles for now,
Lisa x

If you fancy taking a look at what the rest of the team did with for the 3D Challenge, checkout the November edition of Craft Stamper magazine, which is in shops now!!!


Monday, 1 October 2018

INKtober

Hello, welcome to my post for The Artistic Stamper. This month is INKtober month!! Which is perfect for us stampers.

So here is my make...


I first stamped the butterflies from the Insects and Butterflies stamp set with brown distress ink then heat embossed them with clear embossing powder.

I made the background by mixing a blue and green distress ink with water on to a craft mat, then swooped a piece of white card through the ink.

I then used The Artistic Stamper Random Dots 6 x 6 stencil with oxide ink and stamped over the top with the ring stamps from the A4 Swirls, Splats and Dots stamp set with oxide ink.

I then used the Decay Alphabet Lower Case set to stamp the sentiment onto another piece of card with the same ink, then matted and layered it.


Thanks for popping by,
toodles for now,
Lisa xx


Pop over to The Artistic Stamper website to see everything I have used.

Swirls, Splats and Dots A4 (cut out and mounted on cling cushioning)      Decay Alphabet lower case size A5 (cut out and mounted on cling cushioning)    Insects and Butterflies 1 A5  (cut out and mounted on cling cushioning)    The Artistic Stamper Mask- Random Dots 6" x 6"