Hello lovely peeps and welcome to my post for the Itsy Bitsy design team. I have been playing with lots of mixed media products including lots of lovely chipboard pieces.
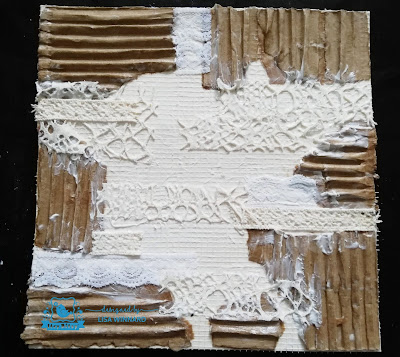
Firstly, I cut a piece of board approx 8 inch square to work on as I needed a good sturdy background to take lots of mixed media products and textures. I first covered the background with some drywall tape. (I love using drywall tape to add texture. It is cheap and easy to use and gives a lovely uniformed pattern with slightly raised texture and you can add more or less to suit.)
I then tore up some cardboard and added pieces to the background using Soft Gel Matte Medium.
I added some Crochet Lace along with some other pieces of textured ribbons.
Next, I cut pieces of the Chipboard Arrows and Chipboard Chevrons and added them to the background using the Soft Gel Matte Medium.
To add lots more texture, I raided my craft stash of metal embellishments. Some of these I have had for years and they consist of bits of broken costume jewellery and purposely bought metal embellishments.
I also added piles of Texture Sand and Mixed Media Stones.
When everything had dried and all the embellishments were secure I painted the whole background with the White Mixed Media Paste. I painted a couple of coats of the Mixed Media paste to ensure the metal embellishments were covered and the whole background was pure white.
I then gave the background a wash of colour with Sailing Sky Chalk Paint. I watered down the paint quite well so the paint flowed in to all the little nooks of the background.
I added some more colour to the middle of the background using Frosted Pool Alcohol Splash.
After the background had dried, I dry brushed a layer of the white Mixed Media Paste to tone the background colour down. While that was drying, I worked on the other chipboard embellishments.
I used the Angel Wings Chipboard and the Compass, which I painted with a watered down version of the Sailing Sky and then added some Vintage Photo Oxide Ink.
I wanted the Compass to have the look of a glass face. I poured a large amount of clear embossing powder in the centre of the Compass and melted it slowly.
I continued to do this until there was a good layer of clear embossing powder over the face of the Compass. I then added a couple of the Silver Mica flakes by melting the surface of the clear embossing powder and gently placing the flakes on the top. I then continued to melt the clear powder until the flakes started to sink in to the melted powder.
I added some silver sparkle to the Angel Wings too using Silver Embossing Powder.
I added some Natural Sisal to the centre of the background then added the Wings and Compass.
Here are some close-ups...
Thank you so much for popping by the Itsy Bitsy blog today to check out my creation. I love to hear your thoughts, so please leave a comment if you wish.
Toodles for now,
Lisa xxx
Here are all the Itsy Bitsy products I used...


I would like to enter this in to the following challenges...
Sandee and Amelie's steampunk challenge - September 2018 Challenge
Creative Artiste Mixed Media Cahllenge Blog - #42


No comments:
Post a Comment